
哪个无服务器边缘平台拥有最快的 git 部署?

部署到边缘变得越来越普遍,有多种服务提供无服务器边缘计算。其中最重要的因素之一是部署速度,因为上下文切换以及等待代码构建和部署会阻碍势头、心流状态和开发者生产力。
那么,哪个无服务器边缘计算平台处理部署速度最快呢?
我决定为以下每个无服务器边缘提供商设置一个微应用并将其连接到 GitHub Actions,这样您就不必亲自操作了。(相信我,您不会想为了一个博客文章而花一个下午折腾 IAM 角色和权限的。)
- Cloudflare Workers
- Vercel
- Fly.io
- Deno
AWS Lambda @ Edge*
* 我很难通过 GitHub Actions 以编程方式使用新部署的 lambda 函数更新 Cloudfront 分发触发器。如果有人对此有任何建议,请告诉我们。
(所有微应用和相应的 GitHub Action 脚本都可以在这里查看。)
结果
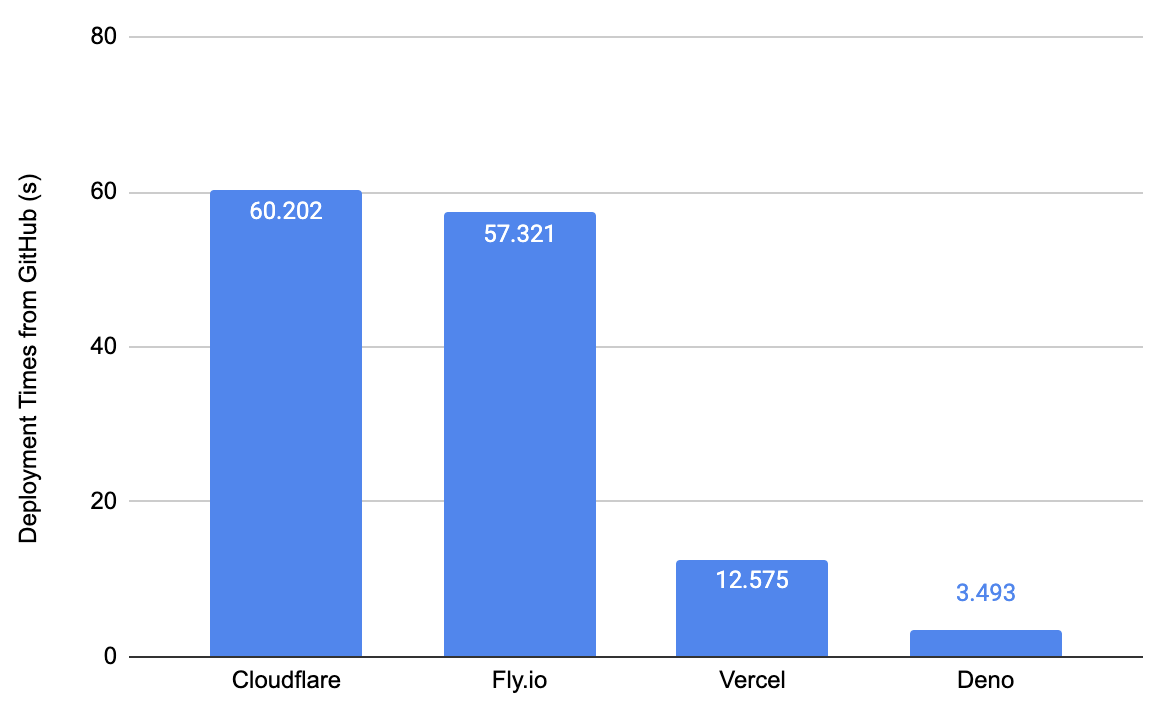
其他边缘提供商的部署时间都在一分钟左右,而 Deno Deploy 则快了几个数量级。其他提供商的大部分部署时间都花在配置机器、安装工具和运行构建上。Deploy 只需上传代码,并在 Deploy 本身完成任何 HTML 生成或客户端 JavaScript 的打包。
诚然,我们是根据狭窄的标准(部署速度)来评估这些无服务器边缘平台的,因为开发者使用它们肯定还有其他原因。尽管如此,CI/CD 流程的部署速度对于开发者生产力和敏捷性至关重要。
下面,我们将深入探讨每个平台的设置过程,并展示从推送到 GitHub 到效果生效的总时间分解。
但首先……我们如何一致地测量 CI/CD Git 部署的速度呢?
方法论
为了确保我们对 CI/CD 部署速度进行“同类比较”,我们将重点关注 从 main Git 分支更新到网站上检测到更改之间的时间,原因如下:
- 在 Git
main分支上推送:尽管 Git 不是运行 CI/CD 服务器的唯一方式,但所有这些供应商都提供 Git 集成或 GitHub Action,因此我们将使用它来消除通过 CI/CD 服务器产生的任何差异。这也是一个很好的计时起点,因为main分支的更新通常标志着 CI/CD 构建过程的开始。 - 网站上检测到更改:由于供应商需要通过其边缘网络传播更新,因此在 GitHub Actions(或 CI/CD 服务器)中构建完成后,到更改反映在网站上会有一段延迟。
为了持续地测量时间,我们使用一个脚本,它会启动一个计时器,反复 ping 网站直到检测到更改,然后输出时间差。所有测试都将在我的机器和我的互联网连接上进行,从而消除这些变量对结果的影响。
第一步是更新边缘函数,使其包含字符串 phrase_to_search_for。
然后,我们运行此命令
$ deno task ping {app_url} {phrase_to_search_for}此命令执行三件事
- 使用
git更新并推送到main分支 - 运行
/tasks/ping.ts,它会启动一个计时器并持续 ping 公共边缘函数地址app_url,直到检测到字符串phrase_to_search_for - 输出时间差
ping.ts 脚本是
/*
 * Usage
 *
 * deno task ping [app_url] [phrase_to_search_for_in_next_deployment]
 *   e.g. deno task ping https://nextjs-vercel-demo-gules.vercel.app/ hazelthenuttypug
 */

const url = Deno.args[0];
const keyPhrase = Deno.args[1];

// Start timestamp.
const startTimeStamp = Date.now();

console.log("");
console.log("");
console.log(`Starting the timer...`);

let noChangeDetected = true;
while (noChangeDetected) {
  const res = await fetch(url);
  const body = await res.text();
  if (body.includes(keyPhrase)) {
    noChangeDetected = false;
    console.log(`${keyPhrase} detected on website...`);
  }
}

// Calculate time difference.
const endTimeStamp = Date.now();
const differenceInTimeStamp = endTimeStamp - startTimeStamp;
console.log(`Total deployment time: ${differenceInTimeStamp / 1000}s`);
此脚本接受两个参数
app_url:已部署应用的公共可访问地址,以及phrase_to_search_for_in_next_deployment:应出现在更新的应用中的字符串,此脚本将使用它来检测更改
例如,我将在 Vercel 函数中添加“hazelthenuttypug”并运行
$ deno task ping https://nextjs-vercel-demo-gules.vercel.app/ hazelthenuttypug让我们深入了解每个平台的结果。
Cloudflare Workers
Cloudflare Workers 是一种在边缘部署和执行代码的常见方法。
设置这个功能相当简单(多亏了这份简短指南)。在他们的界面上点击几下按钮,设置好 GitHub 仓库,然后添加带有必要秘密令牌的 cloudflare/wrangler-action GitHub Action。在 10 分钟内,我就通过推送到 main 分支将我的函数更新到了 Cloudflare Workers。
部署速度
让我们看看 Git 部署需要多长时间。
deno task --cwd cloudflare ping https://test_project.andyjiang.workers.dev/ hazelthenuttypug
Warning deno task is unstable and may drastically change in the future
Task ping git add . && git commit -am 'update' && git push origin main && deno run -A ../tasks/ping.ts "https://test_project.andyjiang.workers.dev/" "hazelthenuttypug"
[main bd9760a] update
 1 file changed, 1 insertion(+), 1 deletion(-)
Enumerating objects: 7, done.
Counting objects: 100% (7/7), done.
Delta compression using up to 8 threads
Compressing objects: 100% (3/3), done.
Writing objects: 100% (4/4), 339 bytes | 339.00 KiB/s, done.
Total 4 (delta 2), reused 0 (delta 0), pack-reused 0
remote: Resolving deltas: 100% (2/2), completed with 2 local objects.
To github.com:lambtron/cloudflare-workers-git-deploy-demo.git
   41efcdf..bd9760a  main -> main


Starting the timer...
hazelthenuttypug detected on website...
Total deployment time: 60.202s
我尝试了几次,它们都大约在一分钟左右。深入研究这个数字,似乎 GitHub Action 本身运行得很快,22 秒(其中 13 秒用于“发布”,它使用 Docker 容器执行 wrangler publish)

剩下的 40 秒左右是更改在 Cloudflare Workers 网络上生效所需的时间。
Fly.io
在使用过 AWS Lambda 和 Cloudflare Workers 之后,Fly.io 的设置非常简单。我按照这份快速入门指南,安装了 flyctl,并在几分钟内通过命令行完成了部署。
通过 GitHub Actions 设置 CI/CD 也相当简单。我从这个 Fly.io 持续部署快速入门中复制并粘贴了 .github/workflows/main.yml,将 FLY_API_TOKEN 添加到我的 GitHub secrets,然后它就一次性成功了。
总的来说,设置体验非常流畅和轻松。
部署速度
现在让我们测试一下部署的速度。
deno task --cwd fly.io ping https://falling-bush-2722.fly.dev/ hazelthenuttypug
Warning deno task is unstable and may drastically change in the future
Task ping git add . && git commit -am 'update' && git push origin main && deno run -A ../tasks/ping.ts "https://falling-bush-2722.fly.dev/" "hazelthenuttypug"
[main 1b2adda] update
1 file changed, 1 insertion(+), 1 deletion(-)
Enumerating objects: 5, done.
Counting objects: 100% (5/5), done.
Delta compression using up to 8 threads
Compressing objects: 100% (3/3), done.
Writing objects: 100% (3/3), 312 bytes | 312.00 KiB/s, done.
Total 3 (delta 2), reused 0 (delta 0), pack-reused 0
remote: Resolving deltas: 100% (2/2), completed with 2 local objects.
To github.com:lambtron/fly-io-git-deploy-demo.git
bc0ab29..1b2adda main -> main
Starting the timer...
hazelthenuttypug detected on website...
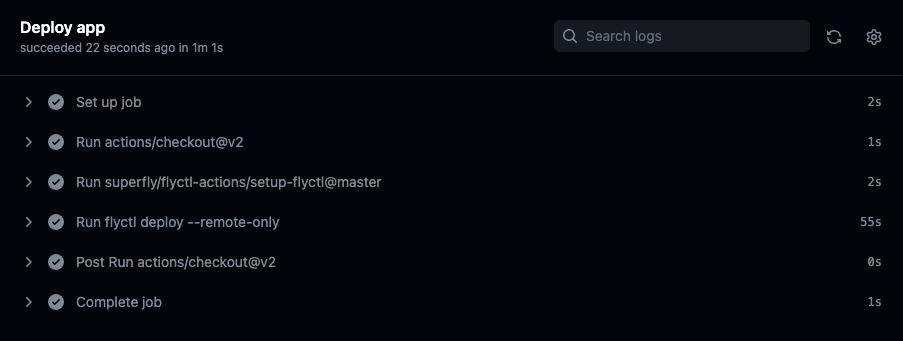
Total deployment time: 57.321s57.3 秒比部署到 Cloudflare Workers 要快,但优势不大。但深入分析,我们发现大部分时间(约 55 秒)花在了 flyctl deploy 上,它会构建 Docker 镜像并将其推送到 fly.io 注册表
Vercel
Vercel 的 Edge Network 是另一个用于边缘部署的流行服务。请注意,Vercel 上的大多数部署都不在其 Edge Network 上。要部署到其边缘,需要额外的几个步骤。
然而,在这里设置一个常规项目很简单。有几种快速入门的方法,例如克隆模板、导入 Git 仓库等。我克隆了一个模板,然后他们让我直接在下一页创建了一个 GitHub 仓库。最棒的是,CI/CD 会随项目自动设置——无需创建 .github 工作流。
接下来,我必须通过遵循这份详细指南,在我的项目中创建一个 Vercel 边缘函数作为路由。这仅仅意味着在 /pages/api/hello.ts 中包含额外的配置代码,所以总的来说并不太难。
如果我更有耐心,我确定有一种方法可以让边缘函数返回 HTML 而不是 JSON。
无论哪种方式,这都是设置带内置 CI/CD 的边缘应用最简单、最轻松的方法。
部署速度
2023/01/23 更新:特别感谢Ethan-Arrowood 提交 PR,将此示例简化为仅部署一个边缘函数(而不是整个 NextJS 站点)。
ping.ts 脚本检测到的 20 次测试的更新中位数部署速度为 12.575 秒。
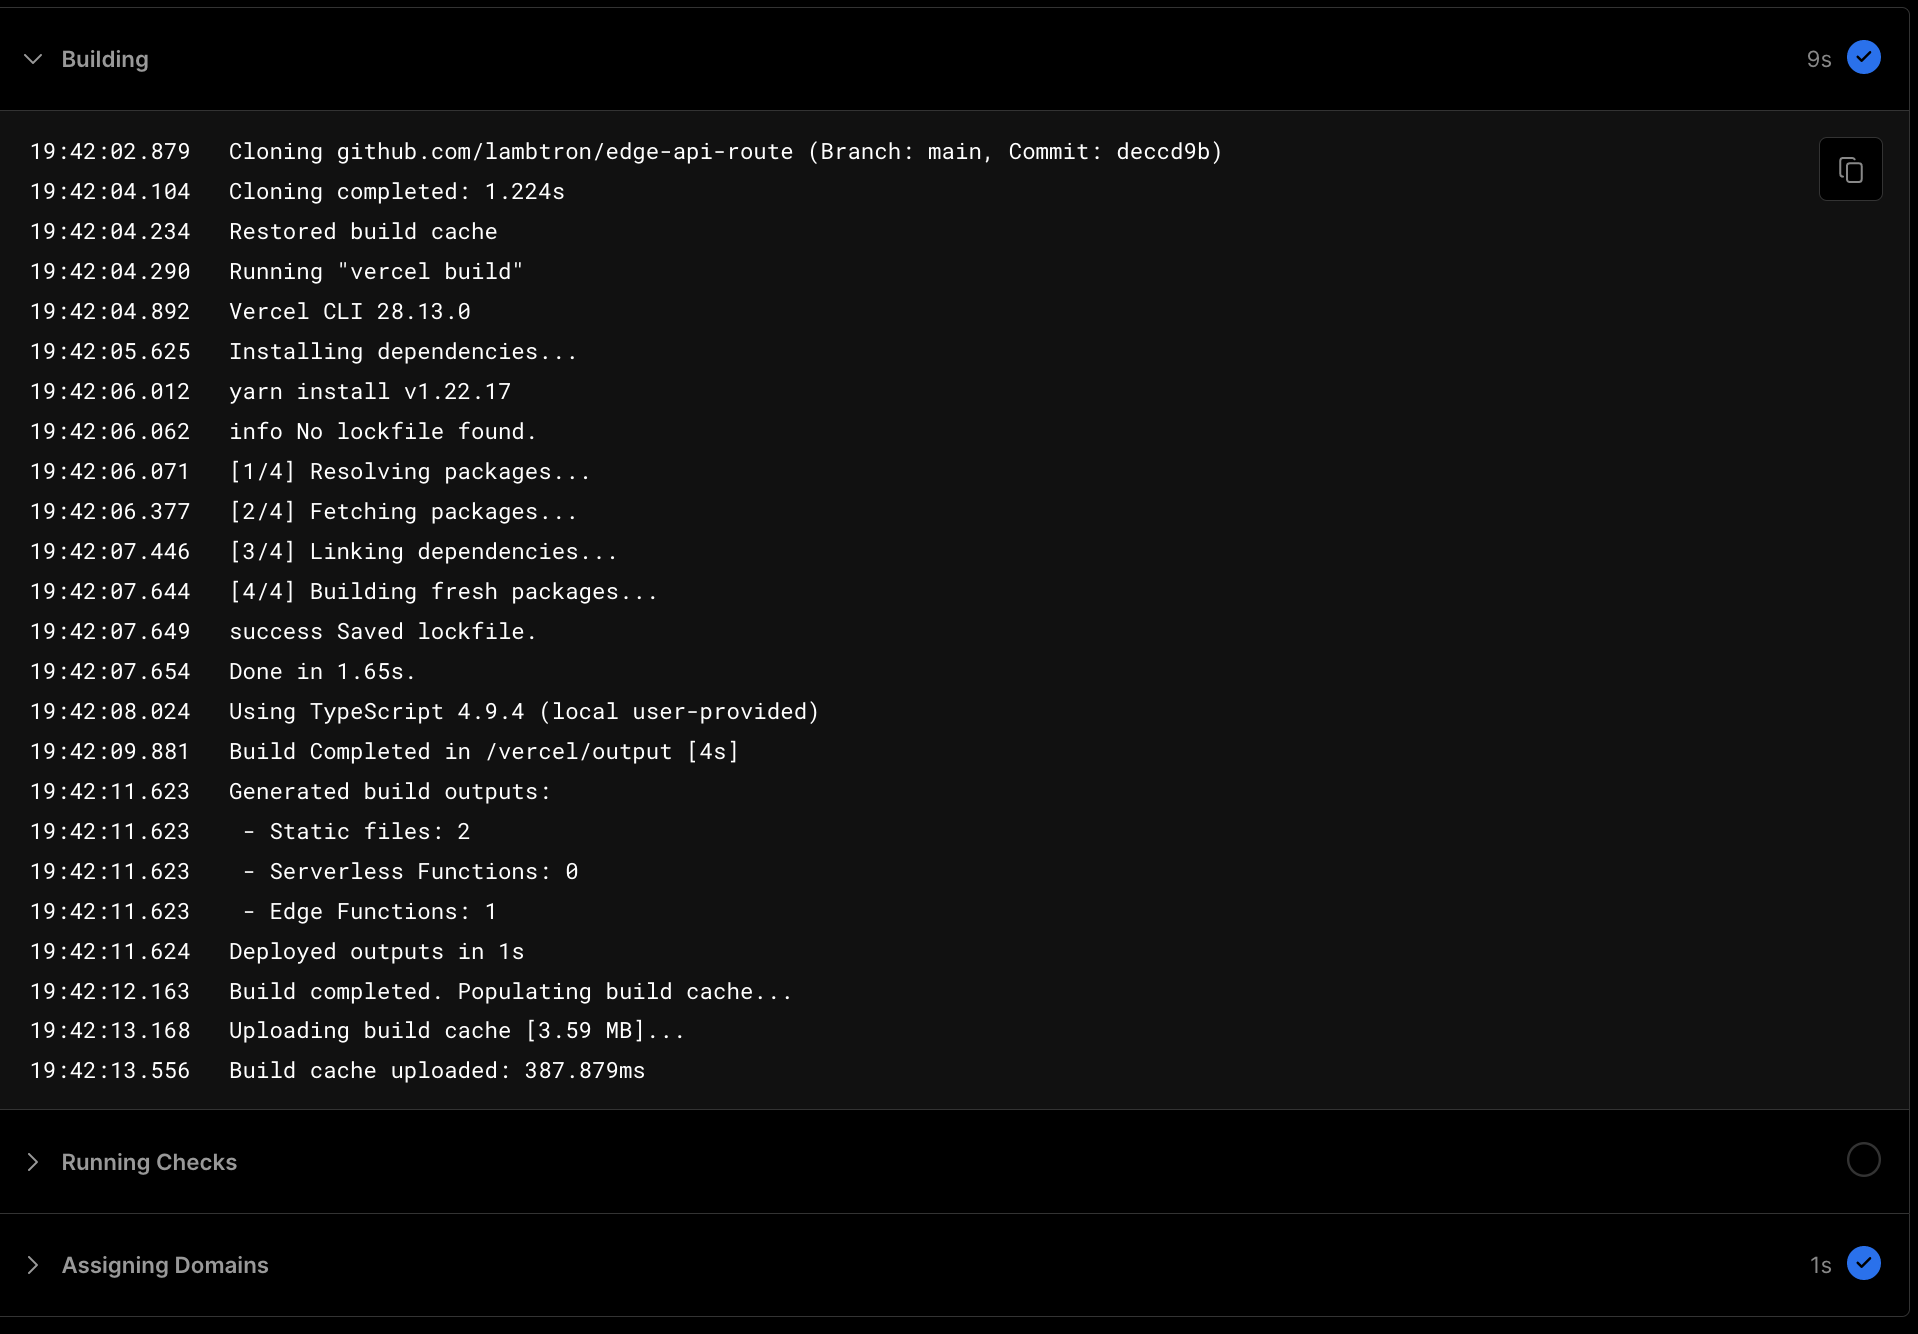
检查 Vercel 中一次随机部署的部署日志
- 克隆 GitHub 仓库:1.224 秒
- 安装和解析依赖:1.65 秒
- 完成构建:4 秒
- 部署输出:1 秒
- 上传构建缓存:387 毫秒
不确定为什么部署日志中输出的秒数不都具有一致的有效数字,但总和大约为 10 秒。
仅将一个边缘函数部署到 Vercel 既简单又相当快,大约 10 秒。
更新结束
让我们测试一下它的部署速度。
deno task --cwd vercel ping https://nextjs-vercel-demo-gules.vercel.app/api/hello/ hazelthenuttypug
Warning deno task is unstable and may drastically change in the future
Task ping git add . && git commit -am 'update' && git push origin main && deno run -A ../tasks/ping.ts "https://nextjs-vercel-demo-gules.vercel.app/api/hello/" "hazelthenuttypug"
[main 5d4b286] update
 2 files changed, 1 insertion(+), 5187 deletions(-)
 delete mode 100644 package-lock.json
Enumerating objects: 9, done.
Counting objects: 100% (9/9), done.
Delta compression using up to 8 threads
Compressing objects: 100% (4/4), done.
Writing objects: 100% (5/5), 462 bytes | 462.00 KiB/s, done.
Total 5 (delta 2), reused 0 (delta 0), pack-reused 0
remote: Resolving deltas: 100% (2/2), completed with 2 local objects.
To github.com:lambtron/vercel-edge-git-deploy-demo.git
   5699276..5d4b286  main -> main


Starting the timer...
hazelthenuttypug detected on website...
Total deployment time: 54.041s
检查 Vercel 控制台,我们看到仅构建过程就花了 46 秒。

可以进一步细分为
- 克隆 GitHub 仓库:4.3 秒
- 运行
vercel build(解析、获取、链接、构建依赖):22.25 秒 - 运行
next build(编译、生成静态页面、最终确定页面优化):11.12 秒 - 填充并上传构建缓存:1.3 秒
Deno
Deno Deploy 是我们的多租户分布式 JavaScript 隔离云。
设置起来轻而易举——尽管不如 Vercel 那么简单。我们仍然需要离开 Deno Deploy 网站才能创建 GitHub 仓库。但在 GitHub 仓库创建后,只需通过几个下拉选择,我们就能将项目连接到 Deno Deploy。
除了将 Deno Deploy 连接到 GitHub 的简单性之外,Deno Deploy 只需一个入口文件。在此示例中,我们的整个仓库只有一个 main.ts 文件。
部署速度
让我们测试一下部署速度。
deno task --cwd deno ping https://deno-git-deploy-demo.deno.dev/ hazelthenuttypug
Warning deno task is unstable and may drastically change in the future
Task ping git add . && git commit -am 'update' && git push origin main && deno run -A ../tasks/ping.ts "https://deno-git-deploy-demo.deno.dev/" "hazelthenuttypug"
[main bb0233e] update
 1 file changed, 1 insertion(+), 1 deletion(-)
Enumerating objects: 5, done.
Counting objects: 100% (5/5), done.
Delta compression using up to 8 threads
Compressing objects: 100% (2/2), done.
Writing objects: 100% (3/3), 273 bytes | 273.00 KiB/s, done.
Total 3 (delta 1), reused 0 (delta 0), pack-reused 0
remote: Resolving deltas: 100% (1/1), completed with 1 local object.
To github.com:lambtron/deno-git-deploy-demo.git
   ef7e42a..bb0233e  main -> main


Starting the timer...
hazelthenuttypug detected on website...
Total deployment time: 3.493s
通过 Git 在 3.5 秒内进行全球部署,速度快得惊人。这种神奇的部署速度归因于我们构建 Deno Deploy 的架构决策:Deploy 没有启动虚拟机(VMs)或 Docker 容器,而是使用 V8 隔离(V8 isolates),这使我们能够以更低的开销安全地运行不受信任的代码。
接下来是什么?
我们希望让 Web 开发变得有趣而简单——这包括令人难以置信的快速、神奇的部署体验。最小化上下文切换意味着成为一个更高效的开发者。