
如何为您的 JavaScript 包编写文档


创建和发布开源包是为生态系统和社区做出贡献的绝佳方式。你创造了一些很酷的东西,并希望人们使用它。但仅仅将你的模块发布到注册表并听天由命并不能带来用户。帮助用户成功使用你的包不仅意味着编写简洁、描述性的文档,还意味着确保用户可以在其工作流程中(例如在 VSCode 中)访问文档,从而节省时间。
多亏了 JSDoc,编写与代码紧密结合并能以各种格式供用户使用的文档变得轻而易举。当与 JSR 这样的现代发布流程结合使用时,你可以轻松地为你的包创建全面的文档,这些文档不仅符合你的工作流程,还能直接集成到用户消费你包的工具中。这篇博文旨在涵盖编写 JSDoc 风格注释的最佳实践,以帮助你的用户尽快上手。
- 为什么选择 JSDoc?
- JSDoc 简介
- 提供良好的类型信息
- 标签,标签,标签
- 添加示例
- 但我应该文档化什么?
- 使用 Markdown
- 内部链接
- 保持 JSDoc 最新
- 审核你的 JSDoc
- 接下来
为什么选择 JSDoc?
好的 README 回答了“我为什么要使用你的包?”,而好的文档应该回答“我如何使用你的包?”。浏览你文档的用户有一个需要解决的问题,你的文档应该以最少的点击和按键为他们提供答案。
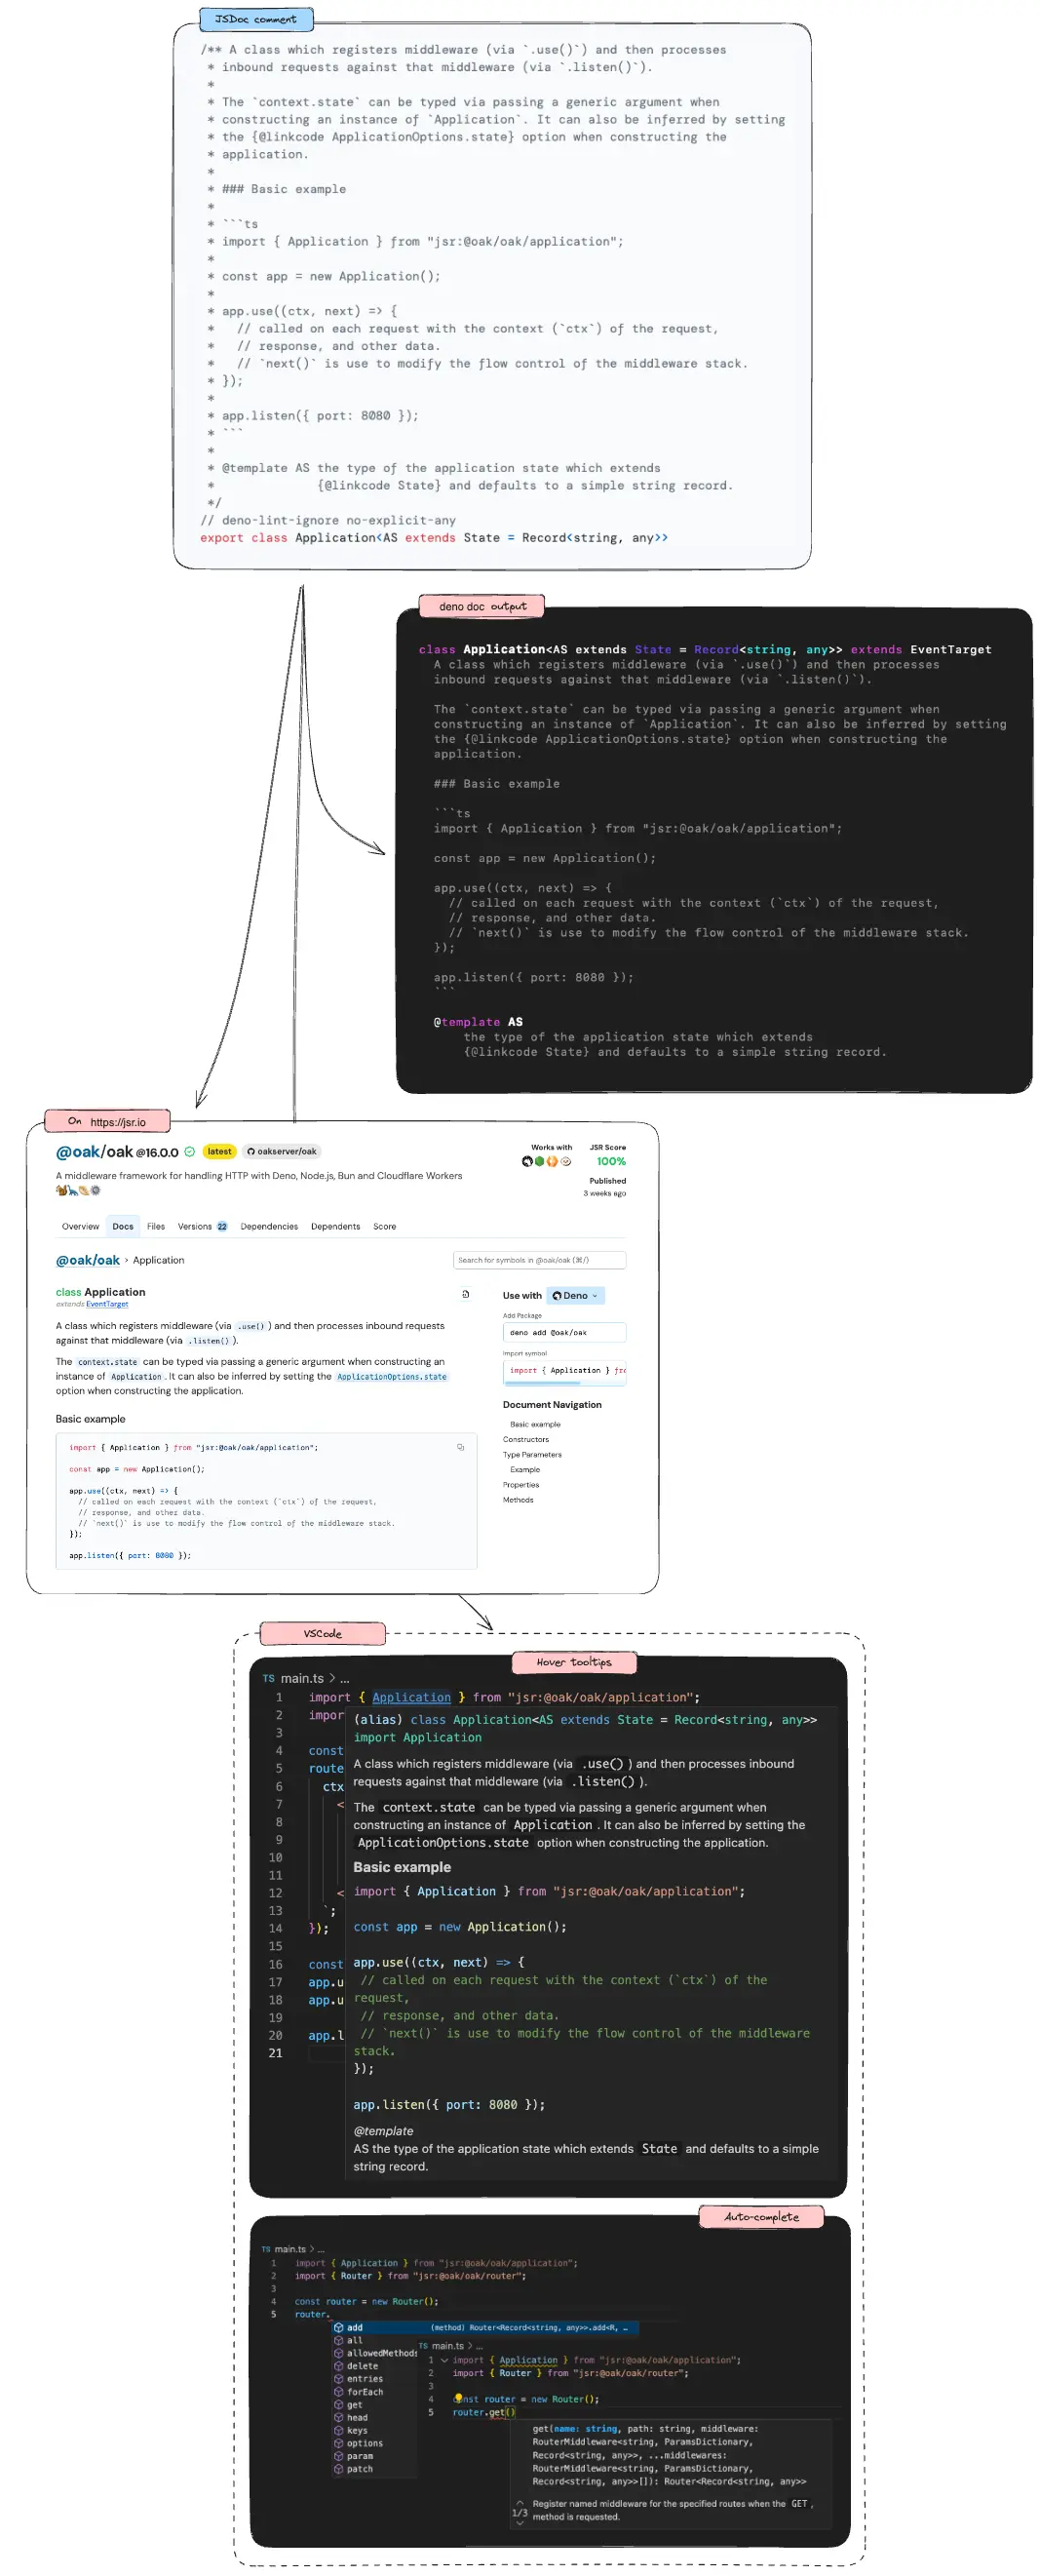
JSDoc 是编写与代码本身紧密结合并能以各种格式(如 HTML、Markdown、JSON,或在他们的 IDE 或文本编辑器中)供用户使用的参考文档的好方法。这是一个 JSDoc 风格注释示例的快速图表,以及它在各种介质中作为文档的显示方式。
编写好的 JSDoc 可以提高你的包的成功率。在我们深入了解一些最佳实践之前,这里对 JSDoc 进行一个简要的总体介绍。
JSDoc 简介
JSDoc 将你代码中的注释转换为可渲染并以各种格式显示的文档对象。
JSDoc 注释是指任何以 /** 开头,以 */ 结尾,并位于代码块之前的块注释。以下是一个示例:
/** Adds two values and returns the sum. */
function sum(value1, value2) {
return value1 + value2;
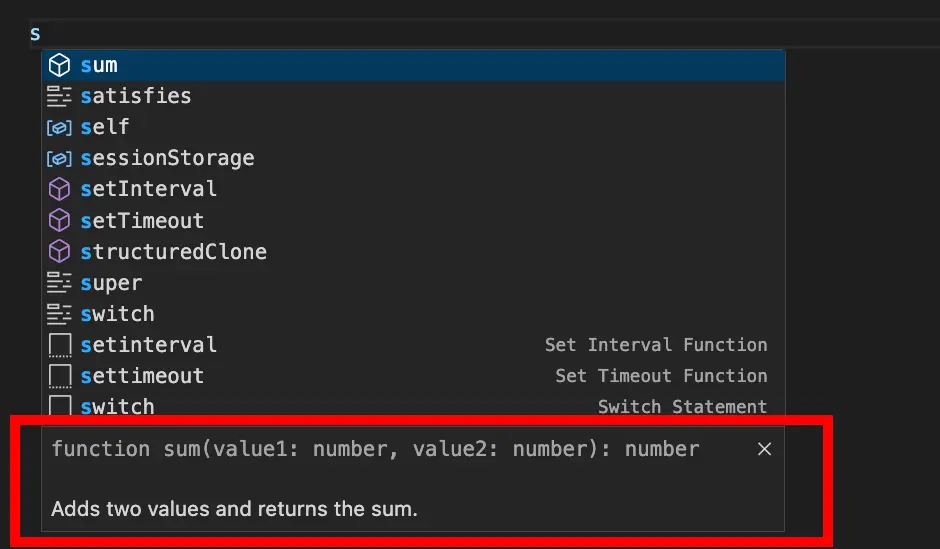
}此 JSDoc 将随后在你的 IDE 中显示为工具提示。

JSDoc 注释可以跨多行。每行应以 * 开头,并缩进一个空格。
/**
 * Adds two values and returns the sum.
 *
 * NOTE: JavaScript math uses IEEE 754 floating point arithmetic, so there may
 * be some rounding errors when adding two numbers.
 */
function sum(value1, value2) {
  return value1 + value2;
}
JSDoc 注释的第一段最为重要。 它是符号的摘要,显示在工具提示、编辑器中的自动完成中,并被搜索索引。第一段应该是对符号的简洁描述,并且应该以帮助用户快速理解此函数功能的方式编写。
例如,不要写:
/**
 * This function takes a string in the first and returns a string. It looks for
 * all the spaces in the input string using a regexp, and then replaces them one
 * by one with an underscore. The function then returns the modified string.
 */
function replaceSpacesWithUnderscores(value) {
  return value.replace(/ /g, "_");
}
相反,请简洁地描述函数的作用:
/**
 * Replaces all spaces in a string with underscores.
 */
function replaceSpacesWithUnderscores(value) {
  return value.replace(/ /g, "_");
}
实现细节、注意事项或示例等附加信息应添加到随后的段落中。因为 JSDoc 支持 Markdown,你甚至可以使用标题来分隔不同的部分。
简洁明了的摘要有助于用户在自动完成时快速筛选符号列表,并找到他们需要的符号。一旦找到符号,他们就可以通读其余部分以了解详细信息。
提供良好的类型信息
在简洁的描述性摘要之后,为你的包中公开的符号提供良好的类型信息非常重要。这主要有两个目的:
- 它允许在编辑器中对参数和返回值进行自动完成,因为编辑器知道参数和返回值的类型。
- 它帮助用户快速筛选函数列表以找到他们需要的函数。例如,如果他们正在寻找一个组合两个字符串的函数,他们可以筛选掉不接受两个字符串作为参数的函数。
在这里,我们将使用 TypeScript 添加类型信息。TypeScript 是增长最快的编程语言之一,它是一种基于 JavaScript 的强类型语言,可以提高代码质量和可维护性,同时提高开发人员的生产力。
/**
 * Adds two values and returns the sum.
 */
export function sum(value1: number, value2: number): number {
  return value1 + value2;
}
在你的编辑器中,当你将鼠标悬停在函数上时,你将看到参数和返回值的类型信息。
当用户在编辑器中输入 sum( 时,他们将看到参数的类型信息。

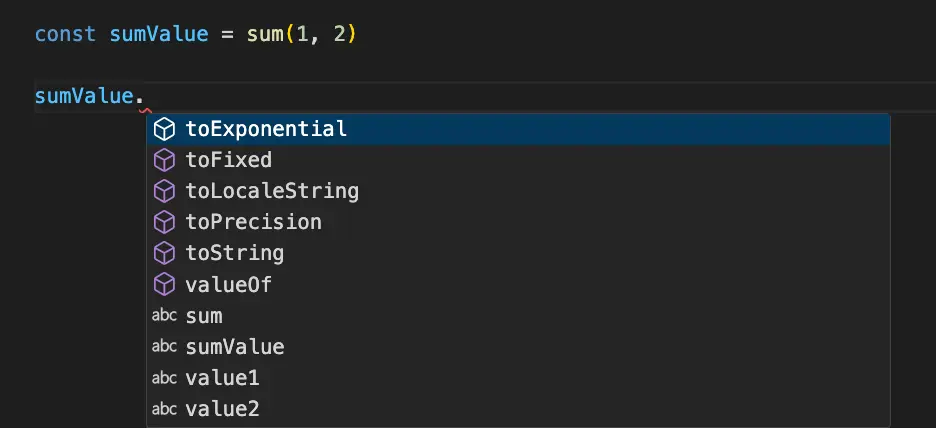
对于返回值,你可以立即获得返回的 number 类型的方法补全。
标签,标签,标签
JSDoc 支持各种标签,可用于提供有关符号的附加信息,例如用于参数的 @param,用于返回值的 @returns,或用于类型参数的 @typeParam。以下是一个包含类型信息和标签的函数示例:
/**
* Find a substring in a string and return the index of the first occurrence.
*
* @param value The string that will be searched for the needle.
* @param needle The substring to search for in the string.
* @returns The index of the first occurrence of the needle in the value, or -1 if the needle is not found.
*/
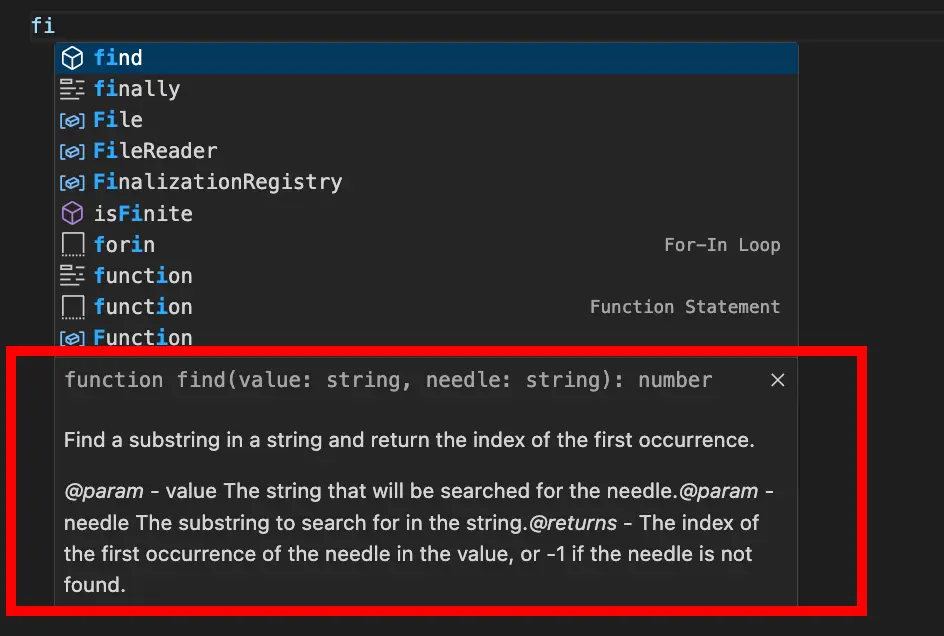
declare function find(value: string, needle: string): number;在你的编辑器中,你将看到参数和返回值的类型信息,以及由标签提供的附加信息。
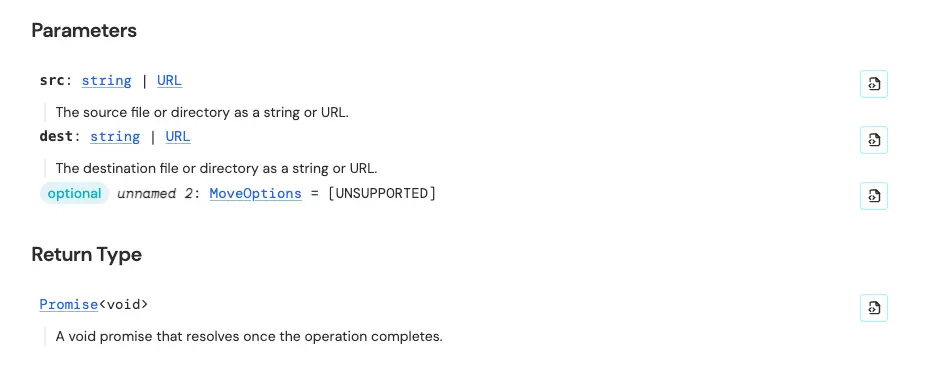
在 JSR 上,标签以 HTML 形式渲染。以下是 deno_std/fs 中的 move 函数的 JSDoc 中 @param 和 @return 标签的示例:
在 JSDoc 中添加示例
示例是帮助用户快速理解如何使用你的库的另一种好方法。这对于具有复杂行为或许多参数的函数尤其有用。可以使用 @example 标签将示例添加到你的 JSDoc 注释中:
/**
 * Find a substring in a string and return the index of the first occurrence.
 *
 * @example Find a substring in a string
 * ```ts
 * const value = "hello world";
 * const needle = "world";
 * const index = find(value, needle); // 6
 * ```
 *
 * @example Find a substring in a string that doesn't exist
 * ```ts
 * const value = "hello world";
 * const needle = "foo";
 * const index = find(value, needle); // -1
 * ```
 */
declare function find(value: string, needle: string): number;
最佳示例应简洁明了,并展示函数最常见的用例。它们应该易于理解,并且可以复制粘贴到项目中。
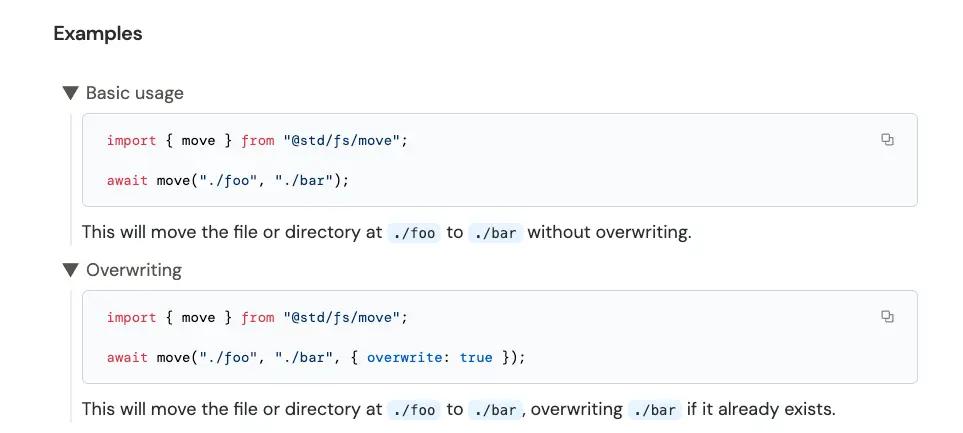
如果存在多个值得提及的用例,你甚至可以提供多个示例。以下是 deno_std/fs 的 move 函数中多个示例如何在 JSR 上显示的示例:
/**
 * (truncated for brevity)
 * @example Basic usage
 * ```ts
 * import { move } from "@std/fs/move";
 *
 * await move("./foo", "./bar");
 * ```
 *
 * This will move the file or directory at `./foo` to `./bar` without
 * overwriting.
 *
 * @example Overwriting
 * ```ts
 * import { move } from "@std/fs/move";
 *
 * await move("./foo", "./bar", { overwrite: true });
 * ```
 *
 * This will move the file or directory at `./foo` to `./bar`, overwriting
 * `./bar` if it already exists.
 */
请注意,紧随 @example 之后的文本用作标题,示例下方的文本则成为其在 JSR 上的描述。
但我应该文档化什么?
你应该文档化你的包导出的每个符号,包括函数、类、接口和类型别名。
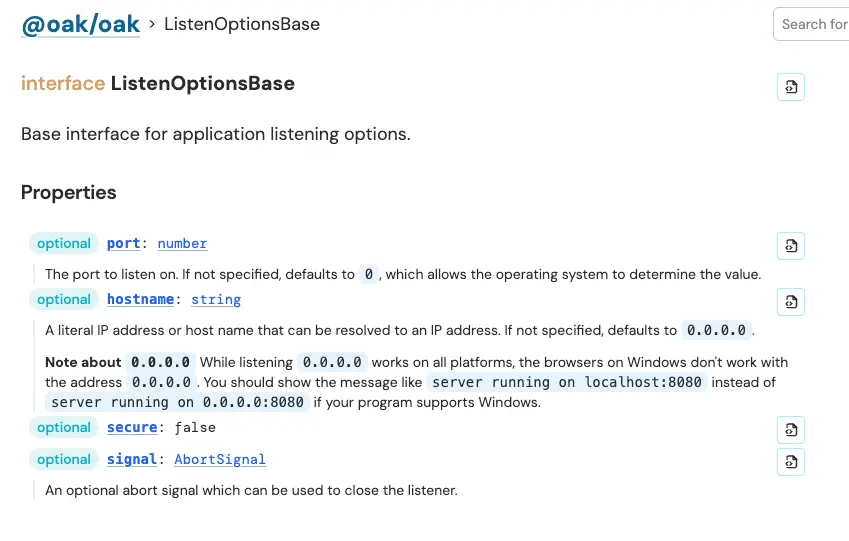
这不仅仅是每个符号一个 JSDoc 注释。例如,对于类和接口,你应该文档化符号本身、其上的每个方法或属性,包括构造函数。这是一个 带有 JSDoc 属性注释的 Oak 接口的示例。
/** Base interface for application listening options. */
export interface ListenOptionsBase {
  /** The port to listen on. If not specified, defaults to `0`, which allows the
   * operating system to determine the value. */
  port?: number;
  /** A literal IP address or host name that can be resolved to an IP address.
   * If not specified, defaults to `0.0.0.0`.
   *
   * __Note about `0.0.0.0`__ While listening `0.0.0.0` works on all platforms,
   * the browsers on Windows don't work with the address `0.0.0.0`.
   * You should show the message like `server running on localhost:8080` instead of
   * `server running on 0.0.0.0:8080` if your program supports Windows. */
  hostname?: string;
  secure?: false;
  /** An optional abort signal which can be used to close the listener. */
  signal?: AbortSignal;
}
如果你的包由多个模块组成,在每个模块文件的顶部添加带有 @module 标签的 JSDoc 注释会很有帮助。这个模块注释应该包括对其导出符号的描述和使用示例。
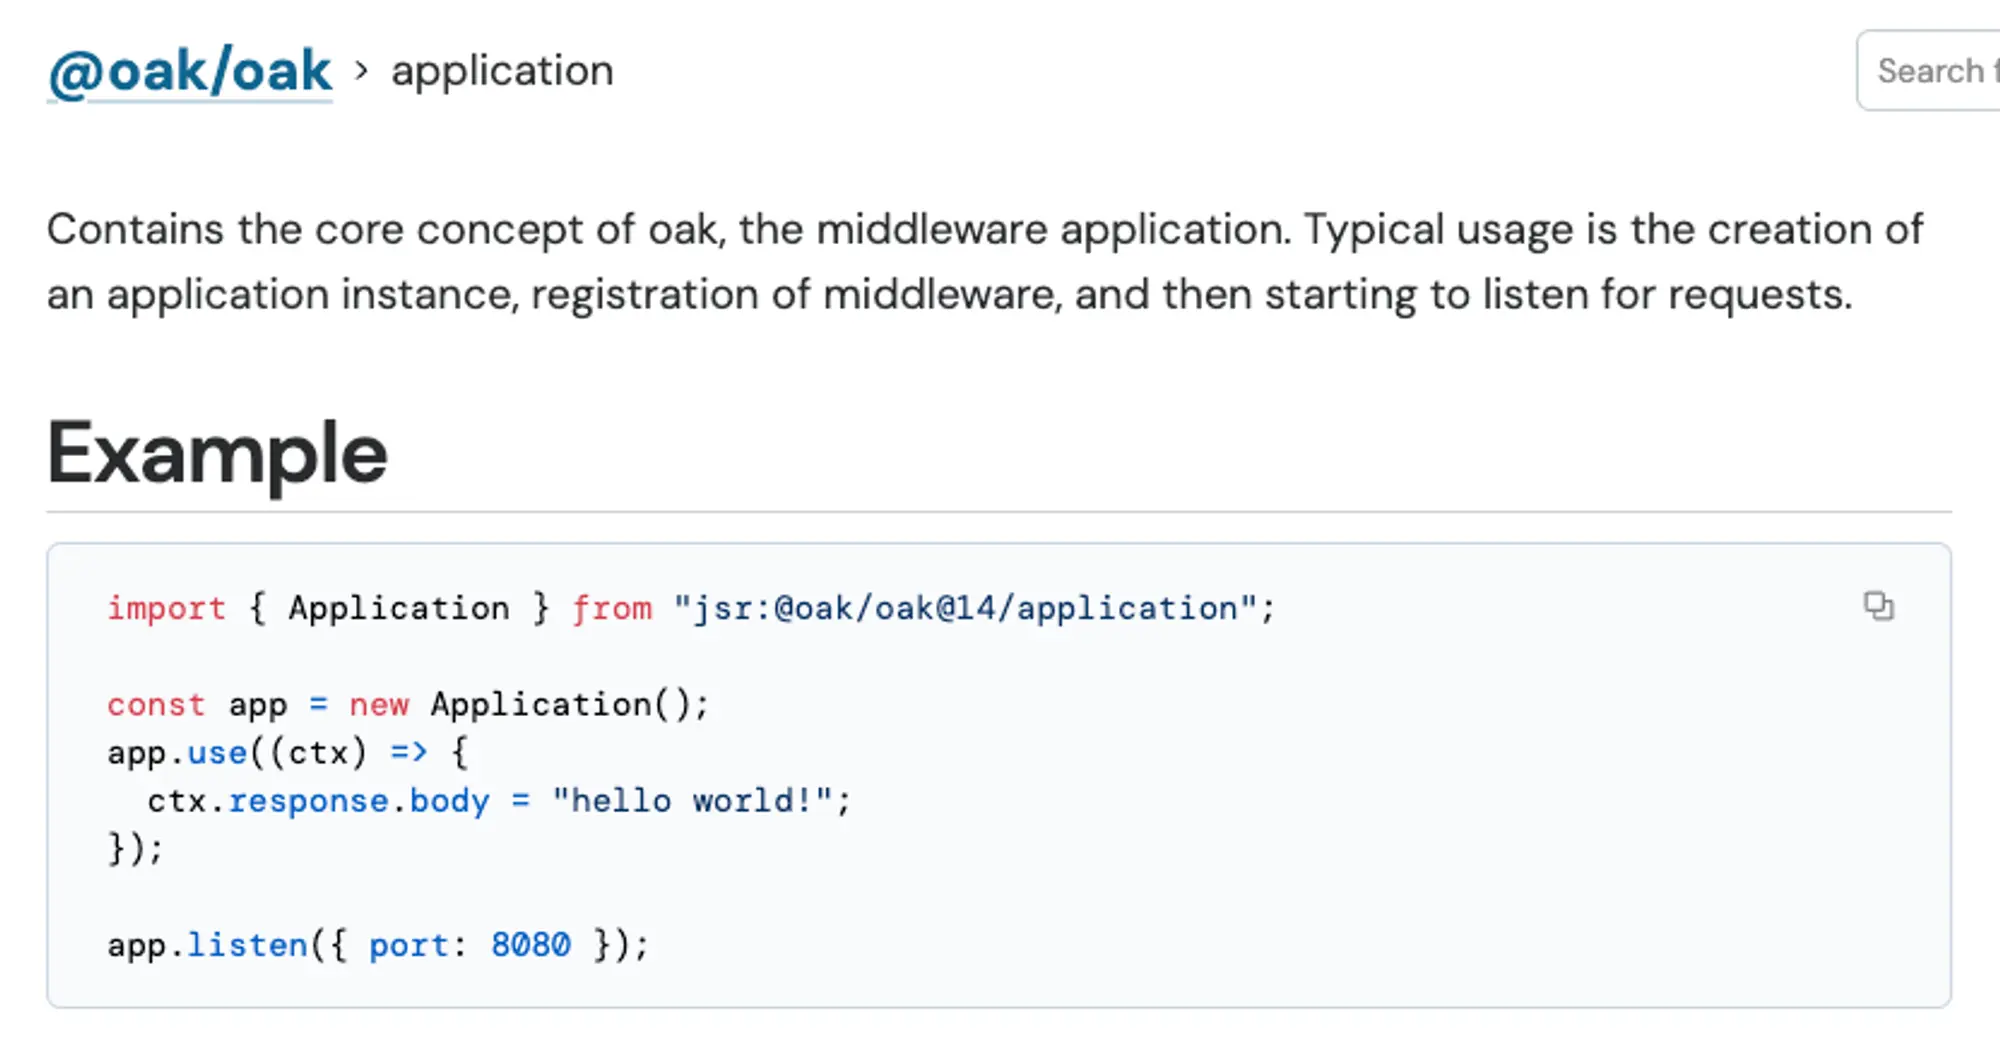
以下是 Oak 的 application.ts 文件中 @module 的示例:
/**
 * Contains the core concept of oak, the middleware application. Typical usage
 * is the creation of an application instance, registration of middleware, and
 * then starting to listen for requests.
 *
 * # Example
 *
 * ```ts
 * import { Application } from "jsr:@oak/oak@14/application";
 *
 * const app = new Application();
 * app.use((ctx) => {
 *   ctx.response.body = "hello world!";
 * });
 *
 * app.listen({ port: 8080 });
 * ```
 *
 * @module
 */
在 JSR 中,第一段将成为你的包的 主文档页面上模块下方的描述。
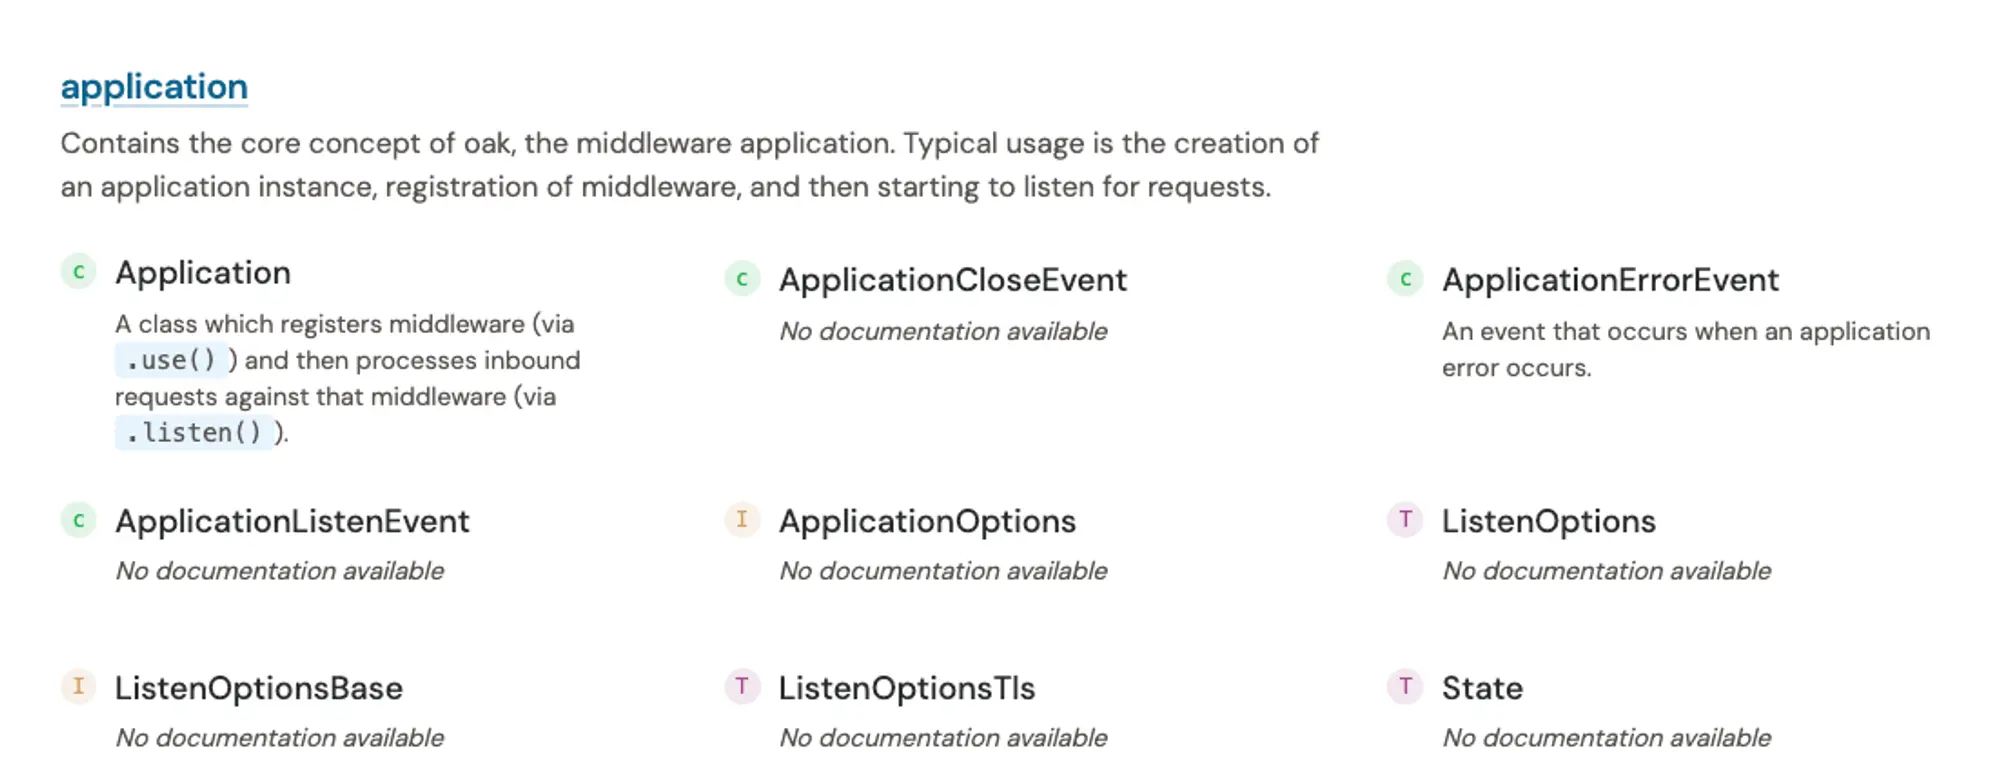
请注意,主文档页面只包含第一段。随后的 JSDoc 注释会在你点击进入模块页面时显示。
使用 Markdown 以获得更好的文档体验
在 JSDoc 中使用 Markdown 可以让你以更易读和更具吸引力的方式组织文档。这有助于你创建更易于理解的文档,并允许你使用链接链接到外部资源或文档的其他部分。
你可以在 JSDoc 注释中使用的一些有用的 Markdown 功能包括:
# my heading用于节标题- hello world用于项目符号**important**用于粗体_noteworthy_用于斜体> quote用于块引用[foo](https://example.com)用于链接`console.log("foo")`用于内联代码片段
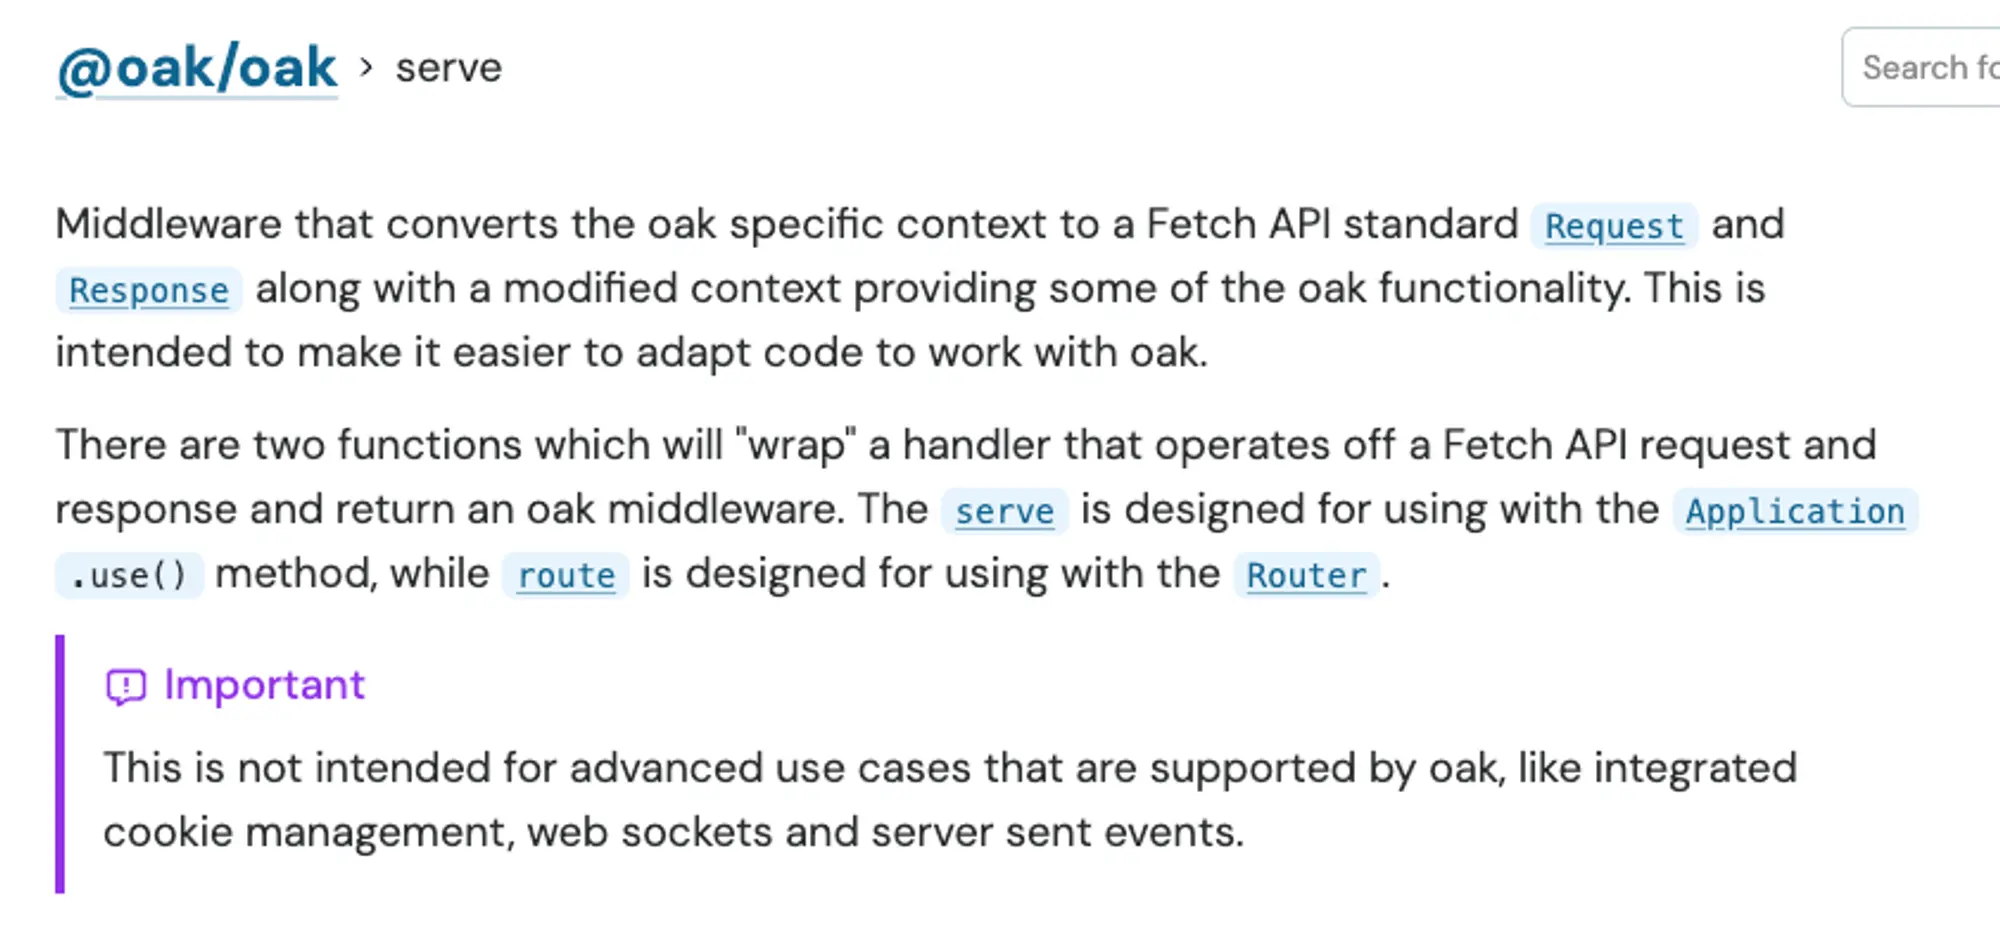
在 JSR 上,你还可以使用 [!IMPORTANT] 来突出显示文档中你想要引起注意的重要信息。
// Copyright 2018-2024 the oak authors. All rights reserved. MIT license.

/** Middleware that converts the oak specific context to a Fetch API standard
 * {@linkcode Request} and {@linkcode Response} along with a modified context
 * providing some of the oak functionality. This is intended to make it easier
 * to adapt code to work with oak.
 *
 * There are two functions which will "wrap" a handler that operates off a
 * Fetch API request and response and return an oak middleware. The
 * {@linkcode serve} is designed for using with the {@linkcode Application}
 * `.use()` method, while {@linkcode route} is designed for using with the
 * {@linkcode Router}.
 *
 * > [!IMPORTANT]
 * > This is not intended for advanced use cases that are supported by oak,
 * > like integrated cookie management, web sockets and server sent events.
 * >
 * > Also, these are designed to be very deterministic request/response handlers
 * > versus a more nuanced middleware stack which allows advanced control.
 * > Therefore there is no `next()`.
 * >
 * > For these advanced use cases, create middleware without the wrapper.
 *
 * @module
 */
此模块级 JSDoc 注释将以如下方式显示在 JSR 的顶层:
内部链接到文档的其他部分
有时,你的文档会引用包内的另一个符号。为了方便用户在文档中导航,你可以使用 @link、@linkcode 和 @linkplain 标签在文档内部进行链接。这些标签接受名称路径或 URL,并从中生成 HTML 锚点元素。以下是一个示例:
/** Options to use when styling text with the {@linkcode print} function. */
export interface StyleOptions {
/** The color to print the message in. */
color: "black" | "red" | "green";
/** Whether to print the message in bold. */
bold: boolean;
/** Whether to print the message in italic. */
italic: boolean;
}
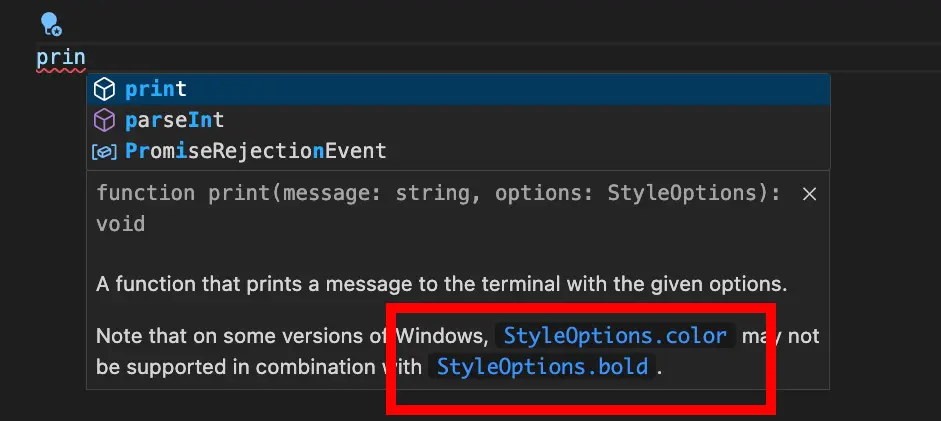
/**
* A function that prints a message to the terminal with the given options.
*
* Note that on some versions of Windows, {@linkcode StyleOptions.color} may not
* be supported in combination with {@linkcode StyleOptions.bold}.
*/
declare function print(message: string, options: StyleOptions): void;在 VSCode 中,悬停工具提示现在包含可点击的链接,这些链接将直接带你到定义该符号的代码处。
以下是 @linkcode 在 JSR 中如何显示的示例。在 Oak 的 serve 函数的 JSDoc 中,它引用了 Application,这在 JSR 上成为了一个可点击的链接。

你还可以引用内置的 JavaScript 对象,例如 ArrayBuffer,JSR 将自动链接到相关的 MDN 文档。
让 JSDoc 与代码更改保持同步
使用 JSDoc 的一个好处是,在编写代码的同时编写文档注释。这意味着每当我们对函数、接口或模块进行更改时,我们可以以最小的上下文切换成本对 JSDoc 进行必要的更改。
但如何确保注释中的文档得到更新呢?从文档开始,即“文档驱动开发”,可以帮助你在编写一行代码之前,规划并推理需求。有时,这意味着更早地发现潜在问题,并节省重写代码的时间。(对于更宏观的方法,请查看“README 驱动开发”。)
如果你在文档中包含了代码示例,你可以使用 deno test --doc 从命令行检查它们的类型。这是一个有用的工具,可确保文档中的示例是最新的且可工作的。
例如,基于我们之前的 sum 函数,让我们添加一个包含代码片段的示例:
/**
 * Adds two values and returns the sum.
 *
 * @example
 * ```ts
 * import { sum } from "jsr:@deno/sum";
 * const finalValue = sum(1, "this is a string"); // 3
 * ```
 */
export function sum(value1: number, value2: number): number {
  return value1 + value2;
}
然后,我们可以通过运行 deno test --doc 来检查此示例块中的代码:
deno test --doc
Check file:///Users/sum.ts$8-13.ts
error: TS2345 [ERROR]: Argument of type 'string' is not assignable to parameter of type 'number'.
const finalValue = sum(1, "this is a string");
                          ~~~~~~~
    at file:///Users/main.ts$8-13.ts:2:27
哎呀!在我们修复文档代码中的类型错误后:
deno test --doc
Check file:///Users/sum.ts$8-13.ts

ok | 0 passed | 0 failed (0ms)
这提供了一种快速方法,可以在发布之前检查文档中的代码示例的类型。
审核你的 JSDoc
如果你发布到 JSR,它将根据你的 JSDoc 风格注释处理所有文档的格式化和生成。但是,如果你有兴趣使用自己的工具来审核或测试 JSDoc 注释的输出,这里有一些建议。
deno doc <file>:此 Deno 命令将打印file每个导出成员的 JSDoc 文档。此命令还接受--html标志以生成带有文档的静态站点,以及--json标志以生成你可以自行显示的 JSON 输出。deno doc --lint:此命令将检查问题,例如缺少返回类型或公共类型上缺少 JSDoc 注释。这些 lint 有助于你编写更好的文档并在发布之前发现潜在问题。deno test --doc:我们在这篇文章前面提到过这个命令,它允许你轻松地检查你的文档示例的类型。jsdoc <directory>:JSDoc 自己的 CLI 可以使用其默认模板生成静态文档站点,并提供各种配置选项标志。如果默认模板有点无聊,还有其他模板,例如 docdash,它提供分层导航和语法高亮。
下一步是什么?
为你的 JavaScript 包编写良好的 JSDoc 对其成功至关重要。让我们回顾一下最佳实践:
- 编写简洁的摘要:JSDoc 注释的第一段应该是对符号的简洁描述,帮助用户快速理解其作用。
- 提供良好的类型信息:类型信息帮助用户快速筛选函数列表并找到他们需要的函数。
- 使用标签:
@param、@returns和@typeParam等标签提供有关函数或类的特定部分的更多信息。 - 添加示例:示例帮助用户快速理解如何使用你的库。
- 文档化所有内容:文档化你的包中公开的每个符号,包括整个模块(如果你公开了多个模块)。
- 内部链接:使用
@link、@linkcode和@linkplain链接到文档的其他部分,以帮助用户导航你的文档。 - 测试你的文档:使用
deno test --doc在发布之前检查你的文档示例的类型,并使用deno doc --lint检查 JSDoc 注释中的问题。
遵循这些最佳实践,你可以为你的包创建全面的文档,帮助用户尽快上手使用你的包。
🚨️ 阅读更多关于 JSR 的信息 🚨️