


Deno 1.21 已发布并带有以下新功能和更改
deno checkglobalThis.reportError和"error"事件- Deno 语言服务器和 VSCode 扩展的改进
- REPL 的改进
DENO_NO_PROMPT环境变量- 不稳定 API 的改进
- 增量格式化和代码检查
deno bench的改进- 新的不稳定子进程 API
deno test的改进
如果您已经安装了 Deno,可以通过运行以下命令升级到 1.21 版本
deno upgrade如果您是首次安装 Deno,可以使用以下方法之一
# Using Shell (macOS and Linux):
curl -fsSL https://deno.land/x/install/install.sh | sh

# Using PowerShell (Windows):
iwr https://deno.land/x/install/install.ps1 -useb | iex

# Using Homebrew (macOS):
brew install deno

# Using Scoop (Windows):
scoop install deno

# Using Chocolatey (Windows):
choco install deno
deno check 以及默认不进行类型检查的路径
过去几年表明,能够用类型信息(通常以 TypeScript 的形式)标注 JavaScript 代码是多么有用。这主要有两个好处
- 类型信息有助于自动生成文档,包括以 IDE 提示/补全的形式,以及像 https://doc.deno.land 上的静态文档页面的形式。
- 类型信息可用于验证给定代码片段的语义是否正确(类型检查)。
这两个好处都非常有用,但在不同时间。第一个是环境效益,在开发过程中始终有用。第二个是更复杂的效益,只有在您即将发布代码之前才有用。类型检查器实际上是一个非常非常强大的 linter,可以帮助您在运行代码之前发现问题。
到目前为止,deno run 在运行代码之前总是会自动对其进行类型检查。这有时会带来良好的用户体验,但更多情况下并不是您想要的。其原因通常是类型检查非常缓慢:它往往是影响应用程序启动性能的最大单一因素。
问题在于,大多数开发人员已经在使用 IDE,它在开发时就已经显示了类型检查结果。所有使用 deno lsp 的用户都可以直接获得这种体验。这意味着当他们运行刚刚开发的代码时,即使类型检查实际上没有用,他们也必须等待很长时间才能完成类型检查,因为他们已经可以在 IDE 中看到所有诊断信息了。
此外,随着 JavaScript 正在走向原生类型注解,浏览器在遇到类型注释时使用的语义将与 Deno 不同。它们不会在运行代码之前进行类型检查,而是将该步骤留给开发人员在发布代码之前运行的单独类型检查步骤。
与此一致,我们决定开始让 Deno 默认禁用 deno run 中的类型检查。类型检查将需要使用新的 deno check 子命令明确执行。因为我们知道此更改目前相当具有侵入性,所以我们将放慢速度。我们进行此更改的暂定时间表如下
- 此版本添加了新的
deno check子命令,以及一个DENO_FUTURE_CHECK=1环境变量,可以设置该变量将 Deno 切换到未来将成为默认的“新”默认无类型检查模式。 - 我们将通过几个版本进行宣传,并告知用户此更改。
- 在未来几个月的某个版本中,我们将默认禁用
deno run中的类型检查。
在 deno run 上默认禁用类型检查不意味着我们正在从 Deno 中移除 TypeScript 支持。TypeScript 仍然是 Deno 中的一流语言,我们将继续鼓励用户在他们的项目中使用 TypeScript。我们所做的唯一更改是,用户现在必须明确指定何时要执行类型检查:可以通过运行 deno check,或通过在 deno run 上指定 --check 选项来完成。
新的 deno check 子命令与 deno run 中现有的类型检查相比,默认类型检查语义略有不同:它只报告当前项目的诊断信息(例如 deno lint 或 deno fmt),而不报告任何远程依赖的诊断信息。此行为已通过 deno run 中的 --no-check=remote 标志提供。通过运行 deno check --remote 仍然可以对整个模块图进行类型检查。
我们知道此更改可能出乎某些用户的意料,但实际上我们想进行此更改已经近一年了。我们认为此更改显著改善了 Deno 用户的开发体验,并且我们认为我们可以更好地与 JavaScript 社区作为一个整体在过去所做和未来将做的事情保持一致。
如果您对此更改或计划时间表有反馈,请加入 我们的 Discord 服务器 进行讨论。
globalThis.reportError 和 "error" 事件
此版本将 Deno 中异步事件循环任务(如 setTimeout、setInterval 或事件处理程序)中未捕获异常的错误处理行为与浏览器对齐。Deno 现在具有一个全局的 "error" 事件,该事件将针对上述 API 中任何未捕获的异常进行分派。用户可以 event.preventDefault() 此事件,以防止运行时像通常在未捕获异常时那样以非 0 状态码退出。
此外,已添加 Web 标准 globalThis.reportError,允许用户以与异步事件循环任务中未捕获异常相同的方式报告错误。globalThis.reportError(error) 与 setTimeout(() => { throw error }, 0) 的不同之处在于,前者同步执行异常报告步骤,而后者在未来的事件循环计时中(异步)执行它们。
以下是新功能的示例
// This code will cause Deno to print
// the exception to stderr and will exit with a non 0 status code.
reportError(new Error("something went wrong!"));
// But if a user handles the "error" event, they can prevent termination and log
// the error themselves:
window.onerror = (e) => {
e.preventDefault();
console.error("We have trapped an uncaught exception:", e);
};
reportError(new Error("something went wrong!"));感谢 Nayeem Rahman 贡献此功能!
Deno 语言服务器和 VSCode 扩展的改进
配置文件自动发现和 deno task 集成
如果检测到 deno.json 或 deno.jsonc 文件,Deno 的 VSCode 扩展现在将提示您在工作区中启用它。
此外,配置文件中 tasks 部分定义的任务 将在命令面板中可用
在工作区子路径中启用扩展
此功能添加了期待已久的能力,允许仅在配置工作区的某些部分启用 Deno 扩展,通过使用Deno:启用路径或 "deno.enablePaths" 设置。
例如,如果您有一个类似这样的项目
project
├── worker
└── front_end
如果您只想启用 worker 路径(及其子路径)以启用 Deno,您需要将 ./worker 添加到配置中的Deno: Enable Paths列表中。
测试 API 集成
vscode_deno 现在提供了与 VSCode 测试 API 的集成,使得从 UI 运行 Deno 测试成为可能
请务必更新到最新版本的 Deno VSCode 扩展,才能使用这些功能。
REPL 的改进
REPL 是一个用于快速原型设计和尝试新事物的工具,进行类型检查,特别是对于导入的第三方代码,几乎没有用处。为此,我们决定在 REPL 中禁用导入模块的类型检查,从而实现更快的导入。
此版本中的一个新功能是 --eval-file 标志,可以与 deno repl 子命令一起使用。此标志允许您传入文件路径或 URL 列表,这些文件将在 REPL 启动前执行。此功能对于创建自定义的、专门的 REPL 非常有用。
$ deno repl --eval-file=https://deno.land/std@0.136.0/encoding/ascii85.ts
Download https://deno.land/std@0.136.0/encoding/ascii85.ts
Deno 1.21.0
exit using ctrl+d or close()
> rfc1924 // local (not exported) variable defined in ascii85.ts
"0123456789ABCDEFGHIJKLMNOPQRSTUVWXYZabcdefghijklmnopqrstuvwxyz!#$%&()*+-;<=>?@^_`{|}~"
请记住,通过 --eval-file 标志提供的文件与 REPL 本身在同一范围内执行。这意味着所有文件都作为“纯粹的旧脚本”执行——而不是 ES 模块——并且它们都共享相同的全局范围。这样做的后果之一是,被评估的文件可能需要在 import 语句中使用绝对说明符,因为相对说明符将相对于 REPL 的当前工作目录进行解析。
更多详细信息请参阅 手册条目
感谢 Naju Mancheril 贡献此功能!
此外,REPL 现在提供了一个全局的 clear() 函数,作为 console.clear() 的别名。这与许多浏览器 REPL 中的功能一致。
DENO_NO_PROMPT 环境变量
此版本添加了一个新的 DENO_NO_PROMPT 环境变量。当设置此变量时,deno 将禁用所有交互式提示,即使输出是交互式终端。它的效果与在所有 deno 二进制文件调用中指定 --no-prompt 相同。
不稳定 API 的改进
Deno.upgradeHttp 对 Unix socket 的支持
不稳定的 Deno.upgradeHttp API 可用于执行 HTTP 协议切换,现在支持在基于 Unix 连接运行的 HTTP 服务器上进行协议切换。
Deno.Listener 的 .unref() 方法
Deno.Listener API 现在有了新的 .ref() 和 .unref() 方法,可以调用它们来启用或禁用此监听器上的操作,使其不阻塞事件循环。例如,如果用户通过调用 Deno.listen() 创建一个新监听器,然后在该监听器上调用 .accept(),则进程在接受连接之前不会退出。
如果用户在创建监听器后在其上调用 .unref(),则 .accept() 任务将不再阻止进程退出。事件循环将在所有其他异步任务完成后完成,而忽略监听器的 .accept() 任务的完成状态。
增量格式化和代码检查
deno fmt 和 deno lint 现在使用后台缓存,以跳过已知在之前运行中已格式化或检查过的文件。这些子命令已经非常快,但有了此更改,您在对某些文件运行至少一次后,应该会看到显著的性能改进,尤其是在并行度较低的慢速计算机上工作时。
例如,此更改之前,deno fmt 和 deno lint 在一台 4 核 (2.60GHz) 计算机上运行 deno_std 仓库所需的时间如下
$ time deno fmt
Checked 927 files
1.796s
$ time deno fmt
Checked 927 files
1.799s
$ time deno lint
Checked 872 files
2.201s
$ time deno lint
Checked 872 files
2.209
现在之后
$ time deno fmt
Checked 927 files
1.764s
$ time deno fmt
Checked 927 files
0.114s
$ time deno lint
Checked 872 files
2.292s
$ time deno lint
Checked 872 files
0.106s
请注意,每个命令首次运行后,时间会显著缩短。
此外,从本版本开始,deno fmt 将自动跳过格式化 .git 目录内的文件。
deno bench 的改进
在 Deno v1.20 中,我们引入了一个新的 deno bench 子命令,它允许快速注册和运行代码片段以评估其性能。此子命令以 deno test 为模型,并具有类似的输出格式。
我们收到了社区对这一功能的良好反馈。其中有两项投诉尤为突出
- 在大多数情况下,默认迭代次数太少
- 报告格式信息太少
鉴于我们将 Deno.bench() 标记为不稳定 API,我们借此机会解决了这两项投诉,并为 Deno.bench() API 添加了更多功能。
指定每个用例应运行多少次的 Deno.BenchDefinition.n 和 Deno.BenchDefinition.warmup 现已移除——取而代之的是,基准测试工具将重复运行一个基准用例,直到后续运行之间的时间差异在统计上不显著(这类似于 GoLang 的方法)。
添加了 Deno.BenchDefinition.group 和 Deno.BenchDefinition.baseline,这些字段允许您整齐地分组相关的基准用例,并将其中一个标记为其他用例的比较基础。
// This is the baseline case. All other cases belonging to the same "url"
// group will be compared against it.
Deno.bench({ name: "Parse URL", group: "url", baseline: true }, () => {
  new URL(import.meta.url);
});

Deno.bench({ name: "Resolve URL", group: "url" }, () => {
  new URL("./foo.js", import.meta.url);
});
最后,基准测试报告经过重新设计,包含了更多有用的信息,包括同一组中用例之间的比较。
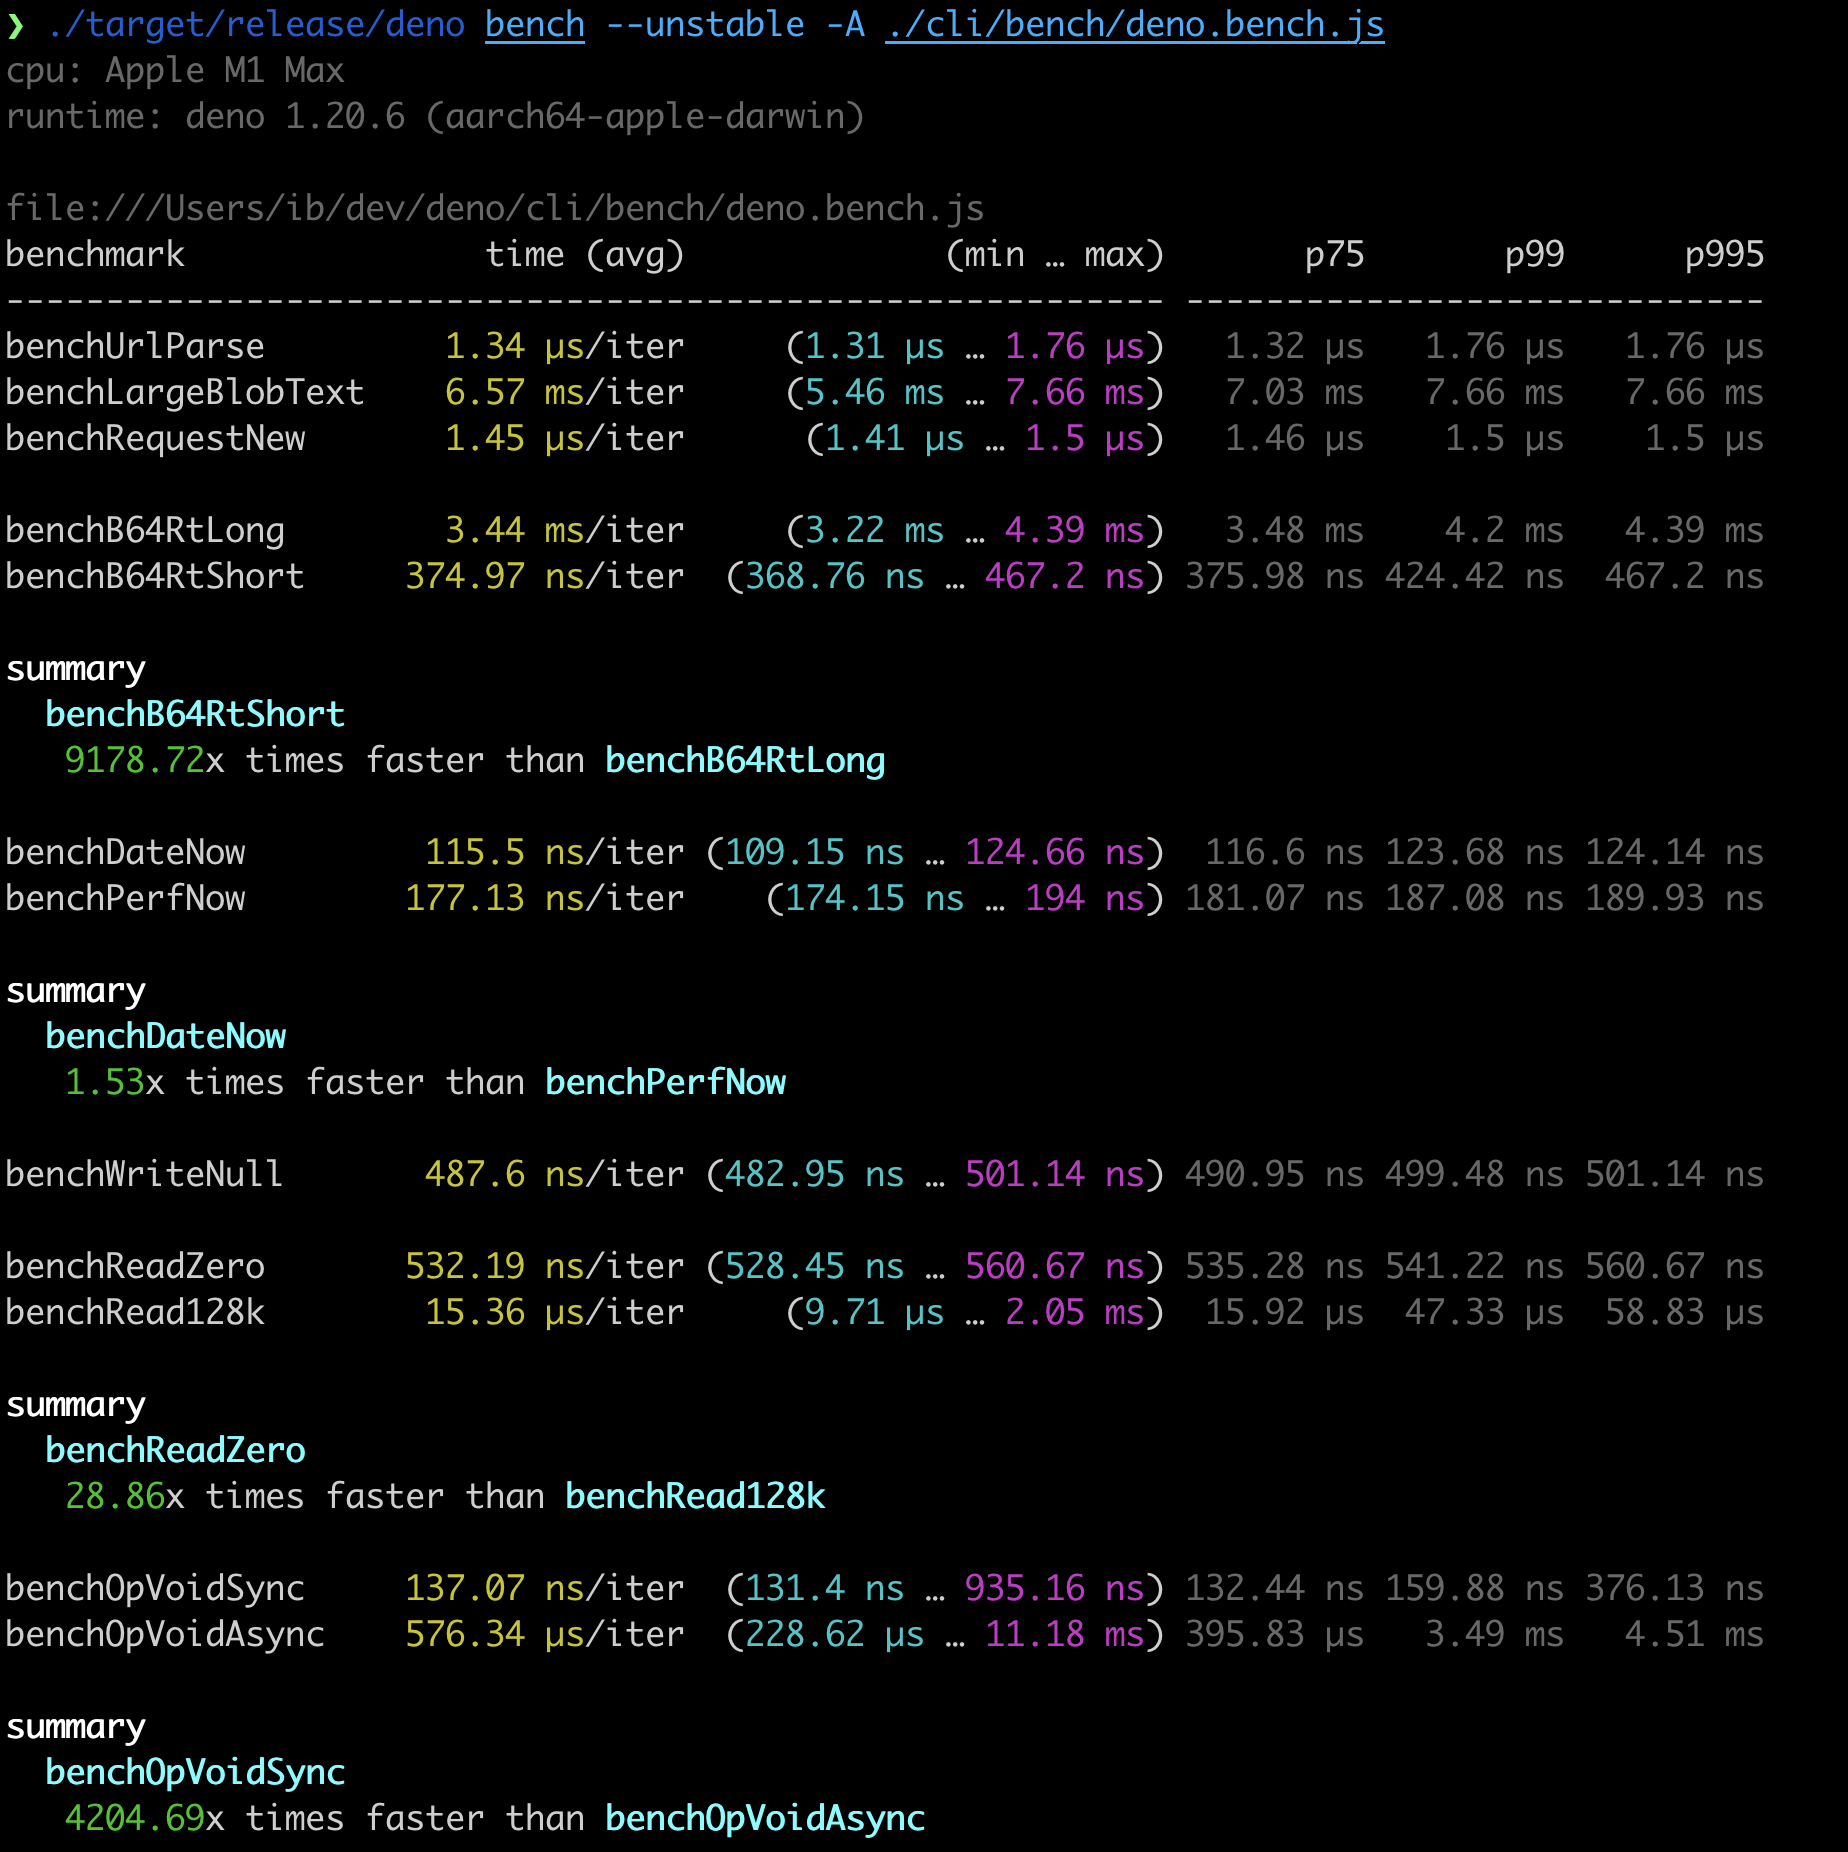
感谢 @evanwashere 贡献此功能。
新的不稳定子进程 API
Deno 1.21 向 Deno 命名空间添加了新的不稳定子进程 API,其中包含了我们从社区收到的关于(即将弃用)Deno.run 子进程 API 的大量反馈。
高级 API
添加了一个新的易于使用的 API,可以在单个调用中生成子进程并收集其输出。Deno.spawn API 接受一个与 Deno.run 接受的选项类似的选项包,但它不返回 Deno.Process 对象,而是返回一个解析为 Deno.SpawnOutput 的 Promise。这包含进程的退出状态,以及包含进程输出到 stdout 和 stderr 的字节的 Uint8Array。
const { status, stdout, stderr } = await Deno.spawn(Deno.execPath(), {
  args: [
    "eval",
    "console.log('hello'); console.error('world')",
  ],
});
console.assert(status.code === 0);
console.assert("hello\n" === new TextDecoder().decode(stdout));
console.assert("world\n" === new TextDecoder().decode(stderr));
低级 API
还添加了一个新的低级 API (Deno.spawnChild)。它与 Deno.run 的工作方式非常相似,但有一些显著差异
所有 stdio 流现在是
ReadableStream/WritableStream,而不是Deno.Reader/Deno.Writer。现在,您可以通过
child.statusgetter 获取状态 promise,而不是调用proc.status()来获取解析为进程退出状态的 promise。子进程不再需要像在
Deno.run中那样使用.close()手动关闭。已添加新的
child.output()API,其返回值与Deno.spawn()相同。
const child = Deno.spawnChild(Deno.execPath(), {
  args: [
    "eval",
    "console.log('Hello World')",
  ],
  stdin: "piped",
});

// open a file and pipe the subprocess output to it.
child.stdout.pipeTo(Deno.openSync("output").writable);

// manually close stdin
child.stdin.close();
const status = await child.status;
同步子进程执行
同步子进程执行是 Deno 以前不可能实现的新功能。这个新的 Deno.spawnSync API 的签名与 Deno.spawn 几乎相同。唯一的区别是返回类型是 SpawnOutput 而不是 Promise<SpawnOutput>。
const { status, stdout, stderr } = Deno.spawnSync(Deno.execPath(), {
  args: [
    "eval",
    "console.log('hello'); console.error('world')",
  ],
});
console.assert(status.code === 0);
console.assert("hello\n" === new TextDecoder().decode(stdout));
console.assert("world\n" === new TextDecoder().decode(stderr));
新 API 尚不稳定。我们鼓励您试用并报告您的任何反馈。
deno test 的改进
此版本为 Deno 的内置测试功能带来了许多改进和新功能。
用户代码输出格式化
以前,deno test 并没有真正意识到用户代码可能产生的任何输出。这种情况通常会导致测试运行器报告和来自您代码的控制台日志之间输出交错。在此版本中,我们重做了测试运行器中的许多底层机制,这使我们能够注意来自您代码的任何输出,无论是来自 console API 方法,还是直接写入 Deno.stdout 和 Deno.stderr。
从本版本开始,如果您的代码有输出,它将被整齐地包含在标记之间,使其与测试运行器的报告区分开来。
我们还在考虑默认捕获此输出,并仅在测试失败时显示。我们很乐意听取您的反馈,请在 此问题 中告知我们。
更详细的错误和堆栈跟踪
deno test 总是为抛出的错误提供完整的堆栈跟踪,但如果您的测试文件没有深层调用堆栈,这并不可取。结果是您会看到许多来自 Deno 内部代码的堆栈帧,这些帧无助于您查明问题出在哪里
// test.ts
Deno.test("error in a test", () => {
  throw new Error("boom!");
});
$ deno test test.ts
Check file:///dev/deno/test.ts
running 1 test from file:///dev/deno/test.ts
test error in a test ... FAILED (3ms)
failures:
error in a test
Error: boom!
at file:///dev/deno/test.ts:2:9
at testStepSanitizer (deno:runtime/js/40_testing.js:444:13)
at asyncOpSanitizer (deno:runtime/js/40_testing.js:145:15)
at resourceSanitizer (deno:runtime/js/40_testing.js:370:13)
at Object.exitSanitizer [as fn] (deno:runtime/js/40_testing.js:427:15)
at runTest (deno:runtime/js/40_testing.js:788:18)
at Object.runTests (deno:runtime/js/40_testing.js:986:28)
at [deno:cli/tools/test.rs:512:6]:1:21
failures:
error in a test
test result: FAILED. 0 passed; 1 failed; 0 ignored; 0 measured; 0 filtered out (9ms)
error: Test failed如上所示,错误包含 8 个堆栈跟踪,但只有顶部帧包含有用的信息来调试问题。
从本版本开始,deno test 将过滤掉来自 Deno 内部代码的堆栈帧,并显示错误发生的源代码行
$ deno test test.ts
Check file:///dev/deno/test.ts
running 1 test from ./test.ts
error in a test ... FAILED (5ms)

failures:

./test.ts > error in a test
Error: boom!
  throw new Error("boom!");
        ^
    at file:///dev/deno/test.ts:2:9

failures:

    ./test.ts
    error in a test

test result: FAILED. 0 passed; 1 failed; 0 ignored; 0 measured; 0 filtered out (15ms)

error: Test failed
感谢 Nayeem Rahman 贡献此功能!
我们打算在未来的版本中进一步改进测试报告器,以提供最佳的测试体验。
BDD 风格测试
在此版本中,我们将 BDD(行为驱动开发)风格的测试运行器添加到了 Deno 标准模块中。
JavaScript 测试生态系统中有两种主要的测试用例组织风格。一种是 test 函数风格(tap、tape 和 ava 属于这一组),另一种是 BDD(jasmine、mocha、jest 和 vitest 属于这一组)风格(或 describe-and-it 函数风格)。
虽然我们为默认测试 API (Deno.test()) 选择了 test 函数风格,因为它简单易用,但社区一直需要 BDD 风格的语法。由于这一需求,我们决定在此版本中添加对这种风格的支持,该功能现在可在 std/testing/bdd.ts 中使用。
describe 和 it 函数的基本用法如下所示
import {
  assertEquals,
  assertStrictEquals,
  assertThrows,
} from "https://deno.land/std@0.136.0/testing/asserts.ts";
import {
  afterEach,
  beforeEach,
  describe,
  it,
} from "https://deno.land/std@0.136.0/testing/bdd.ts";
import { User } from "https://deno.land/std@0.136.0/testing/bdd_examples/user.ts";

describe("User", () => {
  it("constructor", () => {
    const user = new User("John");
    assertEquals(user.name, "John");
    assertStrictEquals(User.users.get("John"), user);
    User.users.clear();
  });

  describe("age", () => {
    let user: User;

    beforeEach(() => {
      user = new User("John");
    });

    afterEach(() => {
      User.users.clear();
    });

    it("getAge", function () {
      assertThrows(() => user.getAge(), Error, "Age unknown");
      user.age = 18;
      assertEquals(user.getAge(), 18);
    });

    it("setAge", function () {
      user.setAge(18);
      assertEquals(user.getAge(), 18);
    });
  });
});
describe 和 it 函数在内部包装了 Deno.test API,因此您可以像往常一样使用 deno test 命令执行上述测试。
$ deno test bdd_example.ts
running 1 test from ./bdd.ts
User ...
  constructor ... ok (4ms)
  age ...
    getAge ... ok (3ms)
    setAge ... ok (3ms)
  ok (10ms)
ok (18ms)

test result: ok. 1 passed (4 steps); 0 failed; 0 ignored; 0 measured; 0 filtered out (40ms)
除了 describe 和 it,我们目前支持 4 个钩子 beforeAll、afterAll、beforeEach 和 afterEach,以及 describe.only、it.only、describe.ignore 和 it.ignore 简写。更多详细信息请参阅 此文档。
感谢 Kyle June 贡献此功能!
模拟工具
在此版本中,我们将模拟工具添加到了 Deno 标准模块中。
当您构建具有外部依赖(例如 Twitter 的 API、某些银行 API 等)的软件,并且无法控制该外部系统时,测试此类软件通常会变得非常困难。解决这种情况的一种方法是使用 模拟对象 来模拟外部系统的行为。我们现在通过我们的模拟工具支持这种测试方式。
我们添加了 2 种基本模拟类型:spy 和 stub,并附带针对这两种类型的断言函数。
spy 是一种记录与它进行的每次交互的对象,您可以稍后断言是否发生了交互。以下示例说明了其基本用法。
import {
  assertSpyCall,
  assertSpyCalls,
  spy,
} from "https://deno.land/std@0.136.0/testing/mock.ts";
import { assertEquals } from "https://deno.land/std@0.136.0/testing/asserts.ts";

Deno.test("how spy works", () => {
  const func = spy();
  // The spy isn't called yet
  assertSpyCalls(func, 0);

  assertEquals(func(), undefined);
  // The spy was called with empty args
  assertSpyCall(func, 0, { args: [] });
  assertSpyCalls(func, 1);

  assertEquals(func("x"), undefined);
  // The spy was called with "x"
  assertSpyCall(func, 1, { args: ["x"] });
  assertSpyCalls(func, 2);
});
stub 是一种模拟预定义行为的对象。以下示例说明了其基本用法。
import {
  returnsNext,
  stub,
} from "https://deno.land/std@0.136.0/testing/mock.ts";
import { assertEquals } from "https://deno.land/std@0.136.0/testing/asserts.ts";

Deno.test("how stub works", () => {
  // Replace Math.random with stub
  // now it returns 0.1 for the 1st call, 0.2 for the 2nd, 0.3 for the 3rd.
  const mathStub = stub(Math, "random", returnsNext([0.1, 0.2, 0.3]));
  try {
    assertEquals(Math.random(), 0.1);
    assertEquals(Math.random(), 0.2);
    assertEquals(Math.random(), 0.3);
  } finally {
    // You need to call .restore() for restoring the original
    // behavior of `Math.random`
    mathStub.restore();
  }
});
我们在此不列出现实示例,因为它们需要大量空间,但请参阅 文档 获取更多详细信息,并查看 示例。
感谢 Kyle June 贡献此功能!
快照测试
在此版本中,我们在 Deno 标准模块中添加了快照测试工具。
快照测试是一种强大的工具,用于测试生成复杂输出的软件,例如生成的语言、AST、命令行输出等。
您可以从 testing/snapshot.ts 导入 assertSnapshot 工具,它负责创建、更新和验证快照。
import { assertSnapshot } from "https://deno.land/std@0.136.0/testing/snapshot.ts";

Deno.test("The generated output matches the snapshot", async (t) => {
  const output = generateComplexStuff();
  await assertSnapshot(t, output);
});
以上调用断言输出与保存的快照匹配。当您还没有快照或想要更新快照时,可以通过使用 --update 选项调用 deno test 命令来更新它。
$ deno test --allow-read --allow-write -- --update
running 1 test from ./foo/test.ts
The generated output matches the snapshot ... ok (11ms)

 > 1 snapshots updated.

test result: ok. 1 passed; 0 failed; 0 ignored; 0 measured; 0 filtered out (46ms)
请注意,您需要授予测试进程 --allow-read 和 --allow-write 权限才能读取和写入快照文件。
感谢 Yongwook Choi 和 Ben Heidemann 贡献此功能!
FakeTime 测试工具
在此版本中,我们在 Deno 标准模块中添加了 FakeTime 测试工具。
测试日期时间功能有时很困难,因为这些功能通常依赖于当前系统日期时间。在此版本中,我们在 std/testing/time.ts 中添加了 FakeTime 工具,允许您模拟系统日期时间和计时器行为。
import { FakeTime } from "https://deno.land/std@0.136.0/testing/time.ts";
import { assertEquals } from "https://deno.land/std@0.136.0/testing/asserts.ts";

Deno.test("test the feature at 2021-12-31", () => {
  const time = new FakeTime("2021-12-31");
  try {
    // now points to the exact same point of time
    assertEquals(Date.now(), 1640908800000);
  } finally {
    time.restore();
  }
});
FakeTime 工具还模拟了 setTimeout、setInterval 等计时器函数的行为。您可以使用 .tick() 调用来控制确切的流逝时间。
import { FakeTime } from "https://deno.land/std@0.136.0/testing/time.ts";
import { assertEquals } from "https://deno.land/std@0.136.0/testing/asserts.ts";

Deno.test("test the feature at 2021-12-31", () => {
  const time = new FakeTime("2021-12-31");
  try {
    let cnt = 0;
    // Starts the interval
    setInterval(() => cnt++, 1000);

    time.tick(500);
    assertEquals(cnt, 0);

    // Now 999ms after the start
    // the interval callback is still not called
    time.tick(499);
    assertEquals(cnt, 0);

    // Now 1000ms elapsed after the start
    time.tick(1);
    assertEquals(cnt, 1);

    // 3 sec later
    time.tick(3000);
    assertEquals(cnt, 4);

    // You can jump far into the future
    time.tick(997000);
    assertEquals(cnt, 1001);
  } finally {
    time.restore();
  }
});
请注意,您始终需要在测试用例的末尾调用 time.restore() 以停止系统日期时间的模拟。
感谢 Kyle June 贡献此功能!