Deno 1.4 发布说明


今天我们发布了 Deno 1.4.0,这是我们迄今为止最大的功能版本。以下是一些亮点:
- Web 标准 WebSocket API:您现在可以像在浏览器中一样使用 WebSockets 进行通信。
- 文件更改时自动重启:使用
deno run --watch启动脚本,以便在文件更改时自动重新加载。 - 集成测试覆盖率:使用
deno test --coverage运行测试,以获取测试覆盖率摘要。
如果您已经安装了 Deno,可以通过运行 deno upgrade 升级到 1.4。如果您是首次安装 Deno,可以使用下面列出的方法之一:
# Using Shell (macOS and Linux):
curl -fsSL https://deno.land/x/install/install.sh | sh

# Using PowerShell (Windows):
iwr https://deno.land/x/install/install.ps1 -useb | iex

# Using Homebrew (macOS):
brew install deno

# Using Scoop (Windows):
scoop install deno

# Using Chocolatey (Windows):
choco install deno
新功能和更改
WebSocket API
此版本增加了对 Web 标准 WebSocket API 的支持,所有现代浏览器都支持此 API。它可用于通过 WebSocket 协议与远程服务器通信。
以下是一个简短的示例,说明其工作原理:
// Start the connection to the WebSocket server at echo.websocket.org
const ws = new WebSocket("ws://echo.websocket.org/");

// Register event listeners for the open, close, and message events
ws.onopen = () => {
  console.log("WebSocket ready!");

  // Send a message over the WebSocket to the server
  ws.send("Hello World!");
};
ws.onmessage = (message) => {
  // Log the message we receive:
  console.log("Received data:", message.data);

  // Close the websocket after receiving the message
  ws.close();
};
ws.onclose = () => console.log("WebSocket closed!");
ws.onerror = (err) => console.log("WebSocket error:", err.error);

// When running this the following is logged to the console:
//
// WebSocket ready!
// Received data: Hello World!
// WebSocket closed!您可以在本地试用:deno run --allow-net=echo.websocket.org https://deno.org.cn/blog/v1.4/websocket.js
此版本还从 std/ws 中移除了 WebSocket 连接方法。请改用 WebSocket API。
deno run --watch
Deno 现在有一个集成的文件监视器,当脚本的任何依赖项更改时,它都可以用于重新启动脚本。
要使用它,像往常一样运行您的脚本,但要添加 --watch 标志。此外,您还必须添加 --unstable 标志,因为此功能尚未稳定。
$ echo "console.log('Hello World!')" > mod.ts
$ deno run --watch --unstable mod.ts
Check file:///home/deno/mod.ts
Hello World
Watcher Process terminated! Restarting on file change...
# now run `echo "console.log('File watching works!')" > ./mod.ts` in a different terminal
Watcher File change detected! Restarting!
Check file:///home/deno/mod.ts
File watching works!
Watcher Process terminated! Restarting on file change...
watch 标志不接受要监视的目录或文件的参数。相反,它会自动确定脚本的所有本地导入并监视它们。
目前,文件监视仅支持 deno run,但将来也会添加到 deno test 以及可能的其他子命令中。
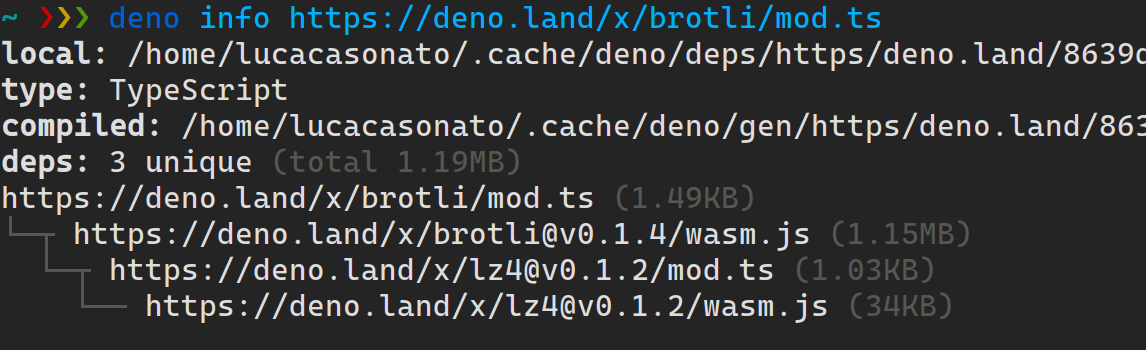
deno test --coverage
您现在可以使用 deno test 的 --coverage 标志找到未被测试覆盖的代码。启用此功能后,所有测试运行完毕后,将按文件打印代码覆盖率摘要。此外,您还必须添加 --unstable 标志,因为此功能尚未稳定。
$ git clone git@github.com:denosaurs/deno_brotli.git && cd deno_brotli
$ deno test --coverage --unstable
Debugger listening on ws://127.0.0.1:9229/ws/5a593019-d185-478b-a928-ebc33e5834be
Check file:///home/deno/deno_brotli/.deno.test.ts
running 2 tests
test compress ... ok (26ms)
test decompress ... ok (13ms)

test result: ok. 2 passed; 0 failed; 0 ignored; 0 measured; 0 filtered out (40ms)

test coverage:
file:///home/deno/deno_brotli/mod.ts 100.000%
file:///home/deno/deno_brotli/wasm.js 100.000%
目前,唯一可用的输出格式是文本摘要。未来将添加 lcov 和 json 等其他输出格式。
在 --unstable 中更严格的类型检查
对于所有使用 --unstable 的用户,isolatedModules 和 importsNotUsedAsValues TypeScript 编译器选项现在将默认开启。未来我们将为所有人默认启用这些标志。这些标志在 TypeScript 编译器中启用了更严格的检查,这可能会导致您以前未见过的一些新错误。
ERROR TS1205: Re-exporting a type when the '--isolatedModules' flag is provided requires using 'export type'.

ERROR TS1371: This import is never used as a value and must use 'import type' because the 'importsNotUsedAsValues' is set to 'error'.
当导入或重新导出接口或类型别名时,会发生这些错误。要解决此错误,请将您的导入和重新导出更改为使用 import type 和 export type。示例:
// Bad
import { MyType } from "./mod.ts";
export { MyType } from "./mod.ts";

// Good
import type { MyType } from "./mod.ts";
export type { MyType } from "./mod.ts";
deno info 改进
用于依赖分析的 deno info 工具在此次更新中进行了重大改进。它现在更快,bug 更少。此外,现在还显示依赖项的文件大小,这使得很容易找出哪些依赖项为您的项目添加了大量代码。
console.log 中的 CSS 样式
大多数现代浏览器都支持使用 CSS 为 console.log 消息设置样式。为了尽可能与 Web 兼容,Deno 现在也支持 console.log 的 CSS 样式。
要为消息设置样式,请在消息中添加 %c 格式参数,并将要应用的样式作为参数传递给 console.log。
console.log("%cStop!", "color:red;font-weight:bold");
// This will print a bold red `Stop!` to the console.
Deno 支持 CSS 属性 color、background-color、font-weight、font-style、text-decoration-color 和 text-decoration-line。对这些属性以及自定义 rgb、hex 和 hsl 颜色的支持取决于您的终端对 ANSI 的支持。
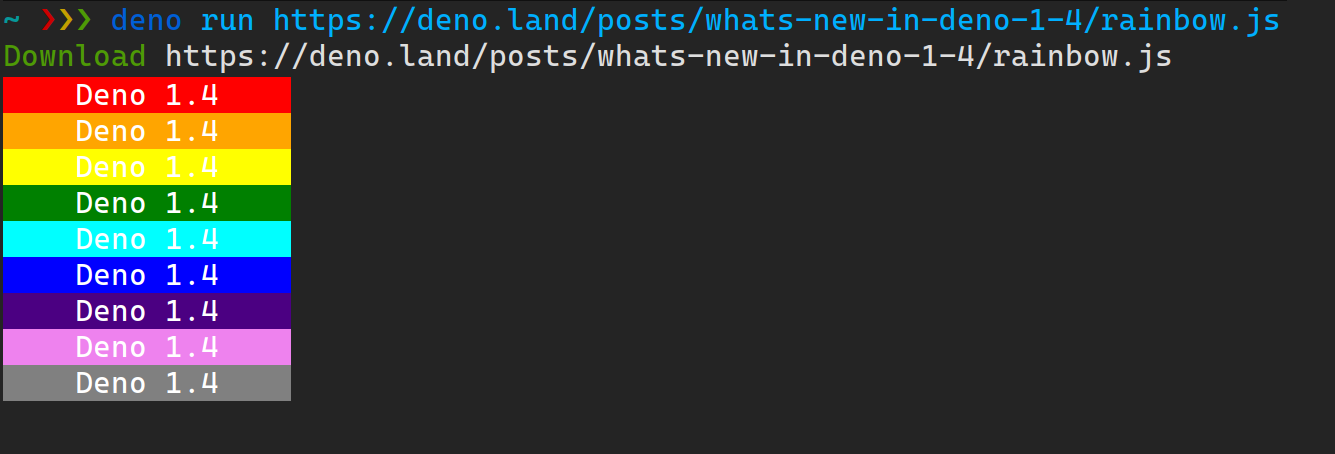 在 https://deno.org.cn/blog/v1.4/rainbow.js 查看源代码
在此版本中,我们增加了对最终规则的支持,这些规则使得 deno lint 规则与推荐的 eslint 和 typescript-eslint 规则集保持一致。这意味着 deno lint 应该能够捕获 @eslint/recommended 和 @typescript-eslint/recommended 可以捕获的所有错误。(性能提升了一个数量级。)这是 deno lint 走向稳定的重要一步。
deno doc 的更新
deno doc 和 https://doc.deno.land 在此版本中也获得了一系列新功能和修复。增加了对 export { foo }; 语法的支持(在声明后导出语句),并且现在支持重新导出多个同名符号。
要试用这些新功能,只需浏览 https://doc.deno.land 上的任何模块即可。它已经随新版本更新。
deno.land/std 中的更改
在此版本中,writeJson、writeJsonSync、readJson 和 readJsonSync 函数已从 https://deno.land/std/fs 中移除。您可以轻松地将它们替换为以下函数:
- const accounting = await readJson("accounting.json");
+ const accounting = JSON.parse(await Deno.readTextFile("accounting.json"));

- const accounting = readJsonSync("accounting.json");
+ const accounting = JSON.parse(Deno.readTextFileSync("accounting.json"));

- await writeJson("hello_world.json", { "hello": "world" });
+ await Deno.writeTextFile("hello_world.json", JSON.stringify({ "hello": "world" }));

- writeJsonSync("hello_world.json", { "hello": "world" });
+ Deno.writeTextFileSync("hello_world.json", JSON.stringify({ "hello": "world" }));
deno_core Rust API 的更改
Deno 的基础子系统 deno_core 随着我们改进 CLI 而不断发展。在 0.57.0 版本中,我们将 CoreIsoate 和 EsIsolate 合并为一个名为 JsRuntime 的单一结构体。此外,还公开了一个更方便创建 ops 的工具。查看示例,了解这些 API 如何协同工作。
VS Code 扩展的更新
Deno 的 VS Code 扩展最近发布了一些重要功能。以下是快速摘要:
远程 URL 智能感知
该扩展的一个重要新功能是针对 deno.land 导入的智能感知。它为您提供 deno.land/x 上模块名称、所有版本及其完整目录列表的自动完成建议。所有这些都无需实际下载模块源代码,而是由 deno.land/x 的最新更新提供支持。
内联 deno lint 诊断
deno lint 现在已与该扩展完全集成。要启用它,只需将扩展中的 deno.unstable 和 deno.lint 设置为 true。完成此操作后,您将获得代码的内联实时诊断。
完整的发布说明,包括错误修复,可在 https://github.com/denoland/deno/releases/tag/v1.4.0 找到。